Introduction
Summary
i-ARM extends Microsoft Purview with comprehensive information protection, records management, and regulatory compliance tools, extending its capabilities to meet the needs of organizations for robust data governance. By integrating with other elements of the data governance lifecycle, i-ARM simplifies the management of retention schedules, ensuring compliance with legal, regulatory, and business requirements.
Key Features and Capabilities:
Repository Inventory
- Facilitates the analysis and application of sensitivity and retention labels across various platforms. This helps ensure that all data is classified and managed according to organizational policies.
Source Configurations
- Offers flexible options to scan, ingest, and classify data from multiple sources, providing organizations with a unified view of their data assets.
Activity Dashboards
- Provides comprehensive insights into label synchronization and publishing within Microsoft Purview, allowing administrators to monitor and manage classification activity.
Explorers for Data Classification and Protection
- Help organizations discover, classify, and take action on files, applying appropriate protection and retention policies to ensure compliance across platforms.
Disposition Review Aggregation
- Enables aggregation and streamlined review of items eligible for disposition, ensuring compliance with retention and disposal policies.
Workspace Governance
- Empowers authorized administrators to create storage locations that support classification, retention, disposition, and compliance. These storage locations integrate with Purview functionality for seamless management.
Retention Schedule Synchronization
- Facilitates synchronization of retention schedules from third-party solutions like Access Virgo and Iron Mountain Policy Center into Microsoft Purview, ensuring a consistent and compliant retention policy framework.
Reports
- Delivers detailed reports on various activities, including label usage, classification results, and data governance actions, enabling organizations to stay informed about their compliance and records management status.
Purpose
This user guide provides comprehensive information to help you get started with and effectively use the i-ARM product. It is designed to guide you through the main features, functions, and troubleshooting tips to ensure you can maximize the value of i-ARM for your organization's records management and regulatory compliance needs.
Topics Covered in this Guide:
- Using the Main Features and Functions
- Learn how to efficiently navigate and utilize i-ARM's core features, including the Regulatory Compliant Records Repository and other key tools that enhance Microsoft Purview's capabilities.
- Setting up a New Source Instance
- Detailed instructions on configuring new source instances
- Exploring i-ARM's Full Feature Set
- An overview of i-ARM's additional capabilities, as outlined in the appendix, to give users a complete understanding of its functionality.
- Contacting Support for Assistance
- How to get in touch with our support team for further help, ensuring you have access to expert assistance whenever needed.
We recommend reading this guide in detail before using the product for the first time. It will provide you with all the necessary information to ensure you are fully prepared to use i-ARM efficiently. You can also refer to the guide whenever you need help or guidance. We hope you enjoy using i-ARM and find it both valuable and reliable for your records management and compliance needs.
Definitions
Below table defines the terms present in i-ARM application.
| # | Term | Description |
|---|---|---|
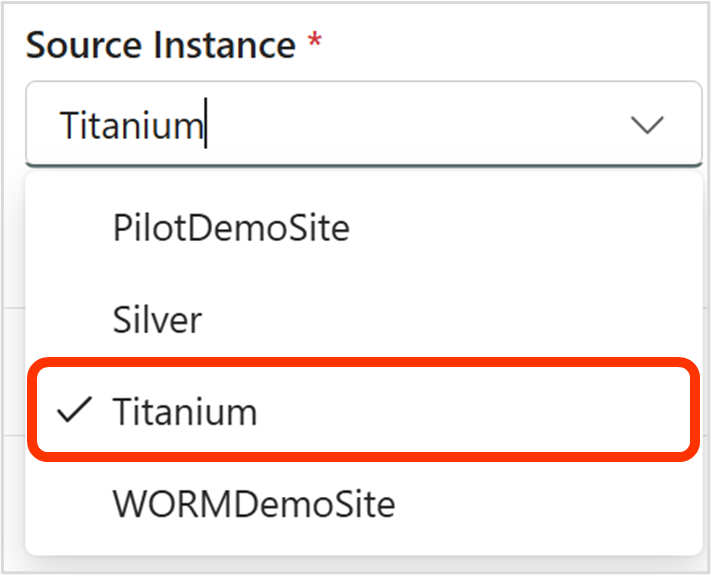
| 1 | Source | Cloud-hosted storage space that needs to be scanned and managed in i-ARM. |
| 2 | Source Instance / Location | A subset of source data to be scanned and managed in i-ARM at a given instance. |
| 3 | Disposition | The type of action that occurs to a file when the retention period expires. Generally, disposition means deletion, but it can include other actions. |
| 4 | Label | Labels contain policies for file/data, including file plan details (retention duration, etc.) and actions (e.g., dispose). |
| 5 | Policy | A set of rules that determine how long items are kept and what happens to them when they expire. |
| 6 | Retention | Number of days the data will be kept before it is marked for disposition. |
| 7 | Manifest File | An XML file consisting of source location name, metadata fields, cloud storage solution links, primary owner, secondary owner, and more. It is used when setting up a new file/data source connection to i-ARM. |
User Roles
| # | Role | Description |
|---|---|---|
| 1 | End User | Can only access the source instance where they are added as a member. |
| 2 | Records Administrator | Can access all the source instances. |
| 3 | iARM Administrator | Can access and create new Source Instance configurations, add/edit reviewers. |
| 4 | eDiscovery Administrator | Can access all the source instances. |
| 5 | Business Reviewer | Can take actions on records where they have been designated as Business Reviewers in "My Disposal" dashboard. |
| 6 | Archive Reviewer | Can take actions on records where they have been designated as Archive Reviewers in "My Disposal" dashboard. |
| 7 | Primary Owners | Can access the source instance and its configuration where they are added as the primary owner. |
| 8 | Secondary Owners | Can access the source instance and its configuration where they are added as the secondary owner. |
| 9 | Members | Can access the data for the source instances they are a member of. |
Components
This section offers a high-level overview of all iARM features, structured around its top horizontal navigation. Starting with the top navigation, this overview will describe the various components of iARM.

| # | Component | Description |
|---|---|---|
| 1 | Overview | The Overview component contains reports for key activities and data tracking in iARM. |
| 2 | Data Explorer | The Data Explorer component leads to the explorer summary dashboard, which includes: |
| - ROT Explorer: Shows files in industry ROT (Redundant, Obsolete, and Trivial) categories. | ||
| - Duplicate Explorer: Identifies duplicate and near-duplicate files for deletion. | ||
| - Empty Explorer: Displays files with zero bytes for deletion. | ||
| - Sensitive Explorer: Categorizes files by sensitive information classification for protection. | ||
| - Records Explorer: Lists files by record label classification. | ||
| - Unclassified Files Explorer: Displays all other files. | ||
| 3 | My Data | The My Data component displays record files, including file metadata, retention labels, and sensitivity labels. Users can open convenience copies of files. These are organized in: |
| - Records Repository (Non-regulatory) | ||
| - Regulatory Compliant Records Repository | ||
| 4 | My Disposal Dashboard | A disposition management dashboard to select, review, and approve disposition activities. |
| 5 | Request a Space | Request Space - Shows the request page to set up a new compliant storage location for SharePoint and Teams. |
| 6 | Reports | The Reports component contains reports for activities across iARM. |
| 7 | Administration | Disposal Settings: Configures the Information Disposal Assessment feature, including: |
| -- Frequency of Checks (Days) | ||
| -- Notification Email (Days) | ||
| Add/Edit Reviewers: Adds or removes business and archive reviewers from a site in the disposal dashboard. | ||
| Source Instance Configuration: A request page to set up new compliant storage locations for data sources such as SharePoint Online, Azure Files, Azure Blobs, Network File Share, AWS, M-Files, and transactional systems. | ||
| Container Settings: Configures the Container Disposal Assessment feature, including: | ||
| -- Frequency of Checks (Days) | ||
| -- Period While Empty (Days) |
Features and Functionality
Overview
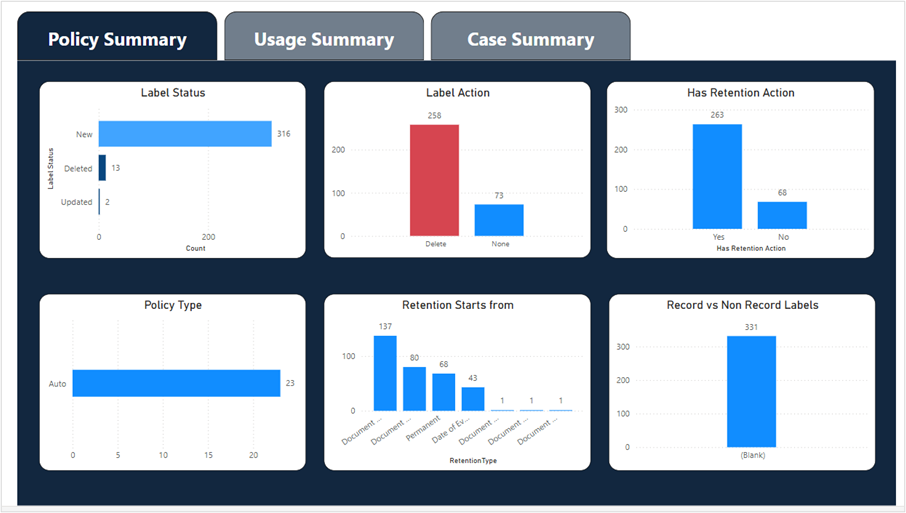
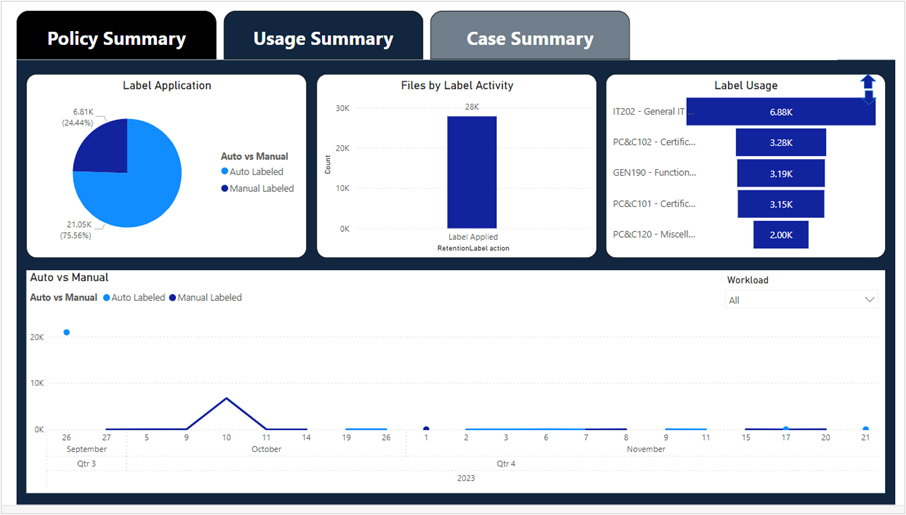
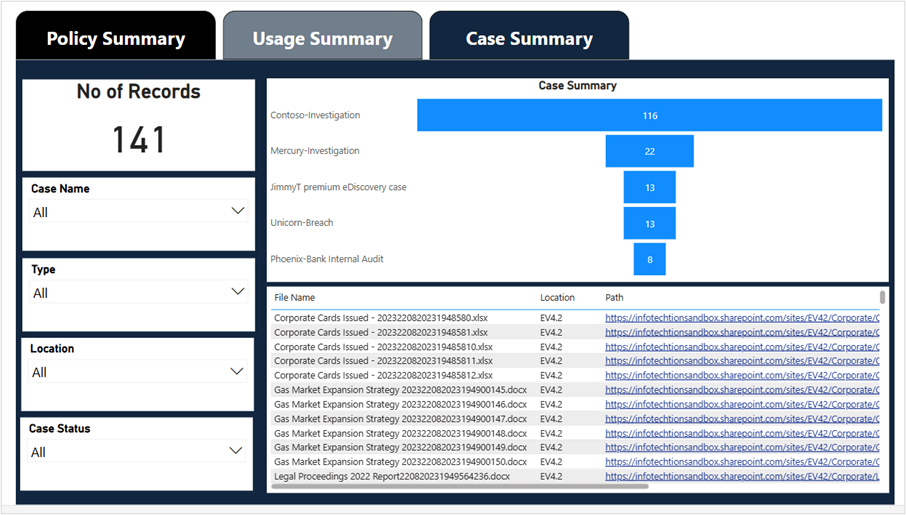
The Overview component provides summary views for a rolled-up is a reporting dashboard with drill down capabilities to key activities, data tracked, and files managed by iARM.
There are 3 top-level dashboards, each with 4 to 6 interactive graphs and charts.


| # | Feature | Description |
|---|---|---|
| 1 | Policy Summary | Shows the volumes, success, and errors related to the synchronization of labels from third-party retention schedule management tools. |
| 2 | Usage Summary | Shows the progress, types, and details of the label publishing capabilities of Purview. |
| 3 | Case Summary | Displays litigation cases in Purview eDiscovery and the number and names of files those cases cover. |
Snapshots of the top-level and drill-down dashboards:
My Disposal Dashboard
My Disposal Dashboard: Introduction
Infotechtion's iARM My Disposal Dashboard provides an intuitive interface for managing and tracking the disposal and archival of information assets. It offers a comprehensive overview of scheduled disposals, ensuring full visibility and control over asset lifecycles. Users can easily review asset details such as serial numbers, status, and disposal schedules, streamlining decision-making and compliance processes.
The dashboard helps organizations meet environmental and data security regulations by incorporating audit trails, disposal certifications, and reporting tools. It ensures proper tracking of hardware disposal and secure data wiping before assets are recycled or resold, reducing risks associated with data breaches.
By simplifying the decommissioning process, iARM's My Disposal Dashboard enhances efficiency, transparency, and compliance. Organizations can confidently manage asset disposal while minimizing legal and security risks.
Overview
iARM's My Disposal Dashboard is a powerful tool designed to streamline and automate records disposition reviews within Microsoft 365. By integrating with SharePoint and Microsoft Purview, it ensures that organizations manage records efficiently, securely, and in compliance with regulatory, legal, and business requirements.
This guide will help users navigate the My Disposal Dashboard, where they can:
-
Review and act on records pending disposition, including deletion, retention extension, reclassification, or archival.
-
Leverage automated disposition workflows, bulk action capabilities, and seamless integration with Microsoft Purview using Microsoft Graph APIs and Power BI.
-
Ensure compliance with retention policies, legal holds, and business regulations such as GDPR, SEC 17a4, and ISO 15489.
-
Monitor and track actions through interactive dashboards, bulk processing, and audit logs for transparency and governance.
-
Simplify records oversight with advanced search, reporting, and bulk processing tools tailored for records managers, compliance officers, and legal teams.
iARM's My Disposal Dashboard simplifies decision-making for business and archive reviewers, helping organizations efficiently manage records while ensuring compliance and reducing unnecessary data retention risks. This guide will provide step-by-step instructions to help achieve the most out of the My Disposal Dashboard.
User Roles and Permissions
| # | Role | Description |
|---|---|---|
| 1 | End User | End Users will only have access to the source instance in which the user is added as a member. |
| 2 | Business Reviewer | Can take actions on records where they have been designated as a Business Reviewer in My Disposal Dashboard. |
| 3 | Archive Reviewer | Can take actions on records where they have been designated as an Archive Reviewer in My Disposal Dashboard. |
| 4 | iARM Administrator | Admins can edit Disposal Settings, Container Settings, and update Business and Archive Reviewers. |
Key Features and Capabilities
-
Centralized Disposition Management -- Provides a single dashboard to review, approve, or extend the retention of records across multiple Microsoft 365 locations, ensuring a streamlined disposal process.
-
Automated Disposition Workflows -- Automates the collection of expired records, aggregates them for review, and enables bulk actions to reduce manual effort and ensure consistency.
-
Seamless Integration with Microsoft Purview -- Ensures that all disposition decisions and actions are automatically communicated to Microsoft Purview using Microsoft Graph APIs for compliance tracking.
-
Multi-Stage Review Process -- Supports multiple levels of review, allowing Business and Archive Reviewers to assess records based on regulatory, legal, and business requirements before final disposition.
-
Bulk Review and Action Capabilities -- Enables users to process large volumes of records at once, whether for deletion, retention extension, or archival, significantly improving efficiency.
-
Advanced Filtering and Sorting -- Provides customizable filters and search options to help reviewers triage, prioritize, and efficiently navigate records requiring action.
-
Automated Notifications & Reminders -- Sends email alerts and dashboard notifications to keep reviewers informed of pending disposition tasks and deadlines.
-
Comprehensive Audit Trails -- Logs all disposition decisions and actions, providing a defensible audit trail for compliance with regulatory and legal requirements.
-
Interactive Dashboards and Reporting -- Leverages Power BI to deliver real-time insights into disposition metrics, compliance status, and pending actions across the organization.
-
Integration with External Retention Schedules -- Synchronizes with external retention management tools (such as Iron Mountain Policy Center) to align retention schedules with Microsoft Purview for seamless governance, facilitating a single source of truth for records managers.
-
Historical Record Tracking -- Maintains a historical log of disposed and archived items, allowing users to reference past decisions and ensure compliance over time.
-
Custom Metadata Retention -- Preserves key metadata associated with records even after disposition, ensuring continuity for compliance and reporting needs.
-
Long-Term Digital Preservation -- Archives digital records in Azure Storage or other preservation solutions after disposition to optimize storage and maintain compliance.
Definitions
- The table below defines the terms present in iARM's My Disposal Dashboard.
| # | Term | Description |
|---|---|---|
| 1 | Source | Cloud-hosted storage space that needs to be scanned and managed in iARM. |
| 2 | Source Instance | A subset of source data to be scanned and managed in iARM at a given interval. |
| 3 | Disposition | The type of action that occurs to a file when the retention period expires. Generally, disposition is deletion, but it can include other actions. |
| 4 | Label | Labels contain policies for file/data that include file plan details (retention duration, etc.) and actions (dispose, etc.). |
| 6 | Retention | Number of days the data will be kept before it is marked for disposition. |
My Disposal Dashboard: Common Functionality (All User Roles)
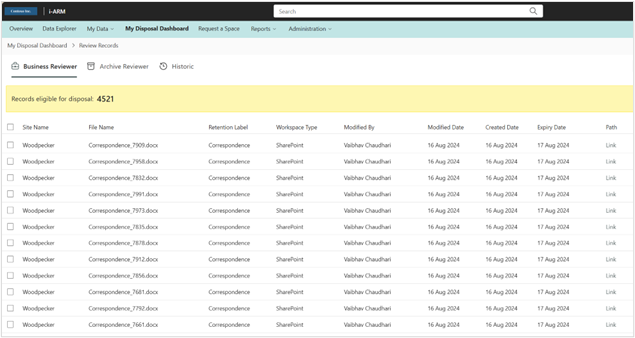
My Disposal Dashboard serves as a centralized hub for selecting, reviewing, and approving disposition and archiving activities, streamlining the records management process.
The dashboard provides an aggregated view of all expired items from their source locations, along with all SharePoint sites where the users hold a Business Reviewer or Archive Reviewer role, ensuring comprehensive oversight of pending actions.
My Disposal Dashboard -- Common Experience
Regardless of the role a user represents in the disposition process, there will some screens that are universal. To review records, there are three views that are relevant and selectable.

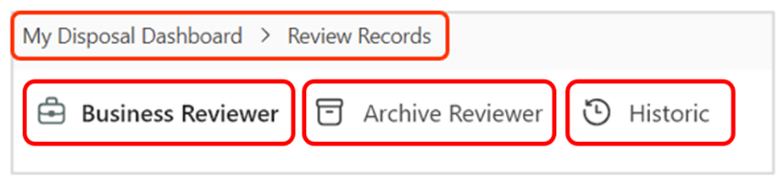
| # | Tab | Description |
|---|---|---|
| 1 | Business Reviewer | This tab provides a list of all files awaiting review and approval by the Business Reviewer to be dispositioned. |
| 2 | Archive Reviewer | This tab provides a list of all files awaiting review and approval by the Archive Reviewer to be dispositioned. |
| 3 | Historic | This tab provides a historical account of actions completed by Business Reviewers and Archive Reviewers. |
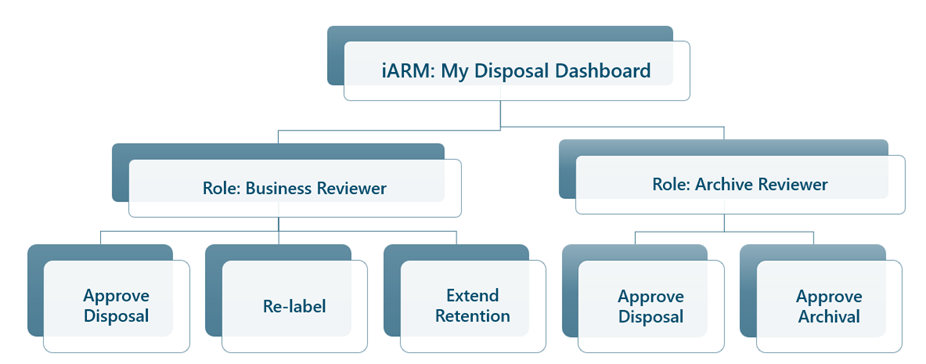
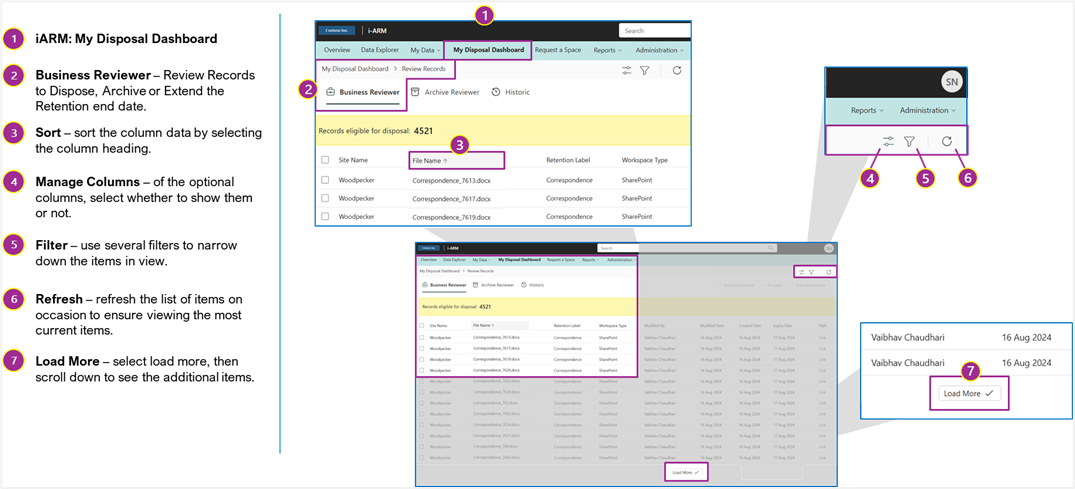
User Interface: Business Reviewer -- My Disposal Dashboard Overview
The following diagram shows the available buttons and actions that can be accessed by the business reviewer when accessing the My Disposal Dashboard.

My Disposal Dashboard -- Manage Columns
Columns can be turned on and off or reconfigured to meet the user's preferences.

The following diagram shows the available buttons and actions that can be accessed by the business reviewer when managing or changing columns.

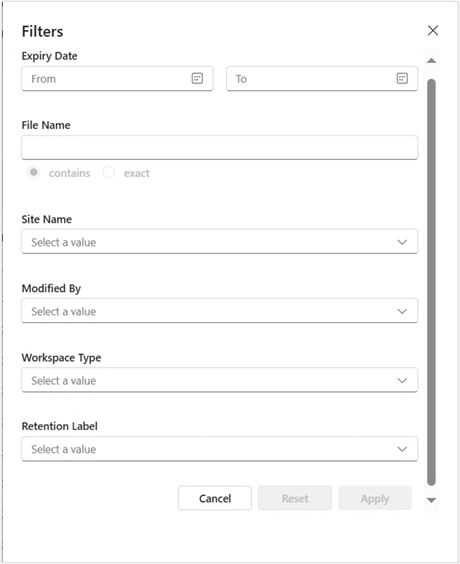
My Disposal Dashboard -- Filtering
Several filtering options can be used to scope the search results designed to group available dispositions into categories that make sense for bulk decisions or more granular reviews.
Selecting the funnel icon brings up the following screens for filtering.
| Filtering files can be accessed by clicking on the icon in the upper right corner. |  |
Once filters are selected and highlighted, click the Apply button to run that filter, or click Reset to start over.
The filter panel allows users to find files by:
| # | Filter | Description |
|---|---|---|
| 1 | Expiry Date | Filters files based on their expiry date. Not applicable to folders as they do not have an expiry date. |
| 2 | Modified Date | Filters items based on the date they were last modified. |
| 3 | File Name | Filters items based on their file name. It has two options: |
| - Contains: Filters items containing the input string. | ||
| - Exact: Filters items matching the exact input string. | ||
| 4 | Retention Label | Filters items based on the retention labels applied to them. |
| 5 | Modified By | Filters items based on the user who last modified them. |
| 6 | Workspace Type | Filters items based on the workspace type. |
| 7 | Site Name | Filters items based on their location. |
The following picture shows the filtering selection panel.
My Disposal Dashboard -- Sorting, Refresh and Load More
<insert information, instructions, QRG slides>
My Disposal Dashboard -- Path (Link)
The path (link) item in the table allows displaying the file in it's current location if that item is still available (has not been deleted). If required, the user will be presented with a dialogue box to request access to the item. Otherwise, the item will be presented.
Historic View/Log
To see and review all past actions, the Historic View table provides the critical names, dates and actions.
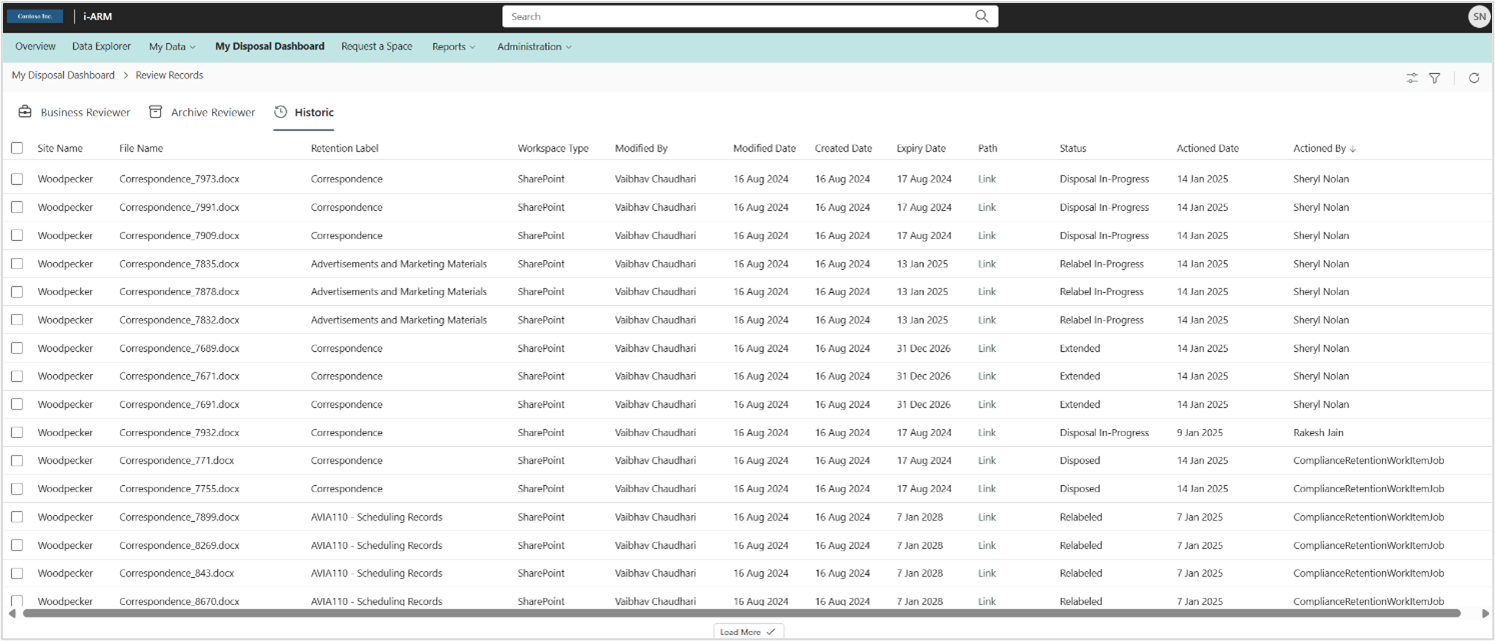
The Historic View table presents the following column details.
| # | Column | Description |
|---|---|---|
| 1 | Site Name | The name of the site where the actioned file came from. |
| 2 | File Name | The name of the file that was actioned. |
| 3 | Retention Label | The label applied to the document, triggering retention and disposition. |
| 4 | Workspace Type | The type of workspace the file came from. Could be any workspace connected through iARM. |
| 5 | Modified By | The user who last modified the file, useful for identifying knowledgeable persons or resolving issues. |
| 6 | Modified Date | The date the file was last modified, a common retention period trigger. Whether retention is based on Modified or Created date depends on policy. |
| 7 | Created Date | The date the file was created, helping determine when the retention period starts. Retention basis depends on policy. |
| 8 | Expiry Date | The date calculated by adding the retention period to the Created/Modified date or event-based trigger. This is when the disposition action occurs. |
| 9 | Path (Link) | A link to the file in its current location (if not disposed). Access permissions are required to view the file. |
| 10 | Status | Indicates whether the file is disposed, in progress, or relabeled. |
| 11 | Actioned Date | The date on which the status was applied. |
| 12 | Actioned By | The name of the reviewer who took the action. |
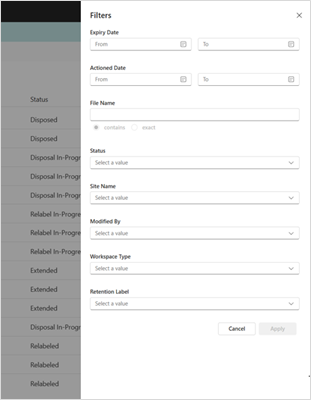
Historic View/Log: Filtering
The table can become quite large, and it is useful to apply filters to narrow down the search for information. The filters work by selecting the appropriate value in the selection box or drop-down menu.
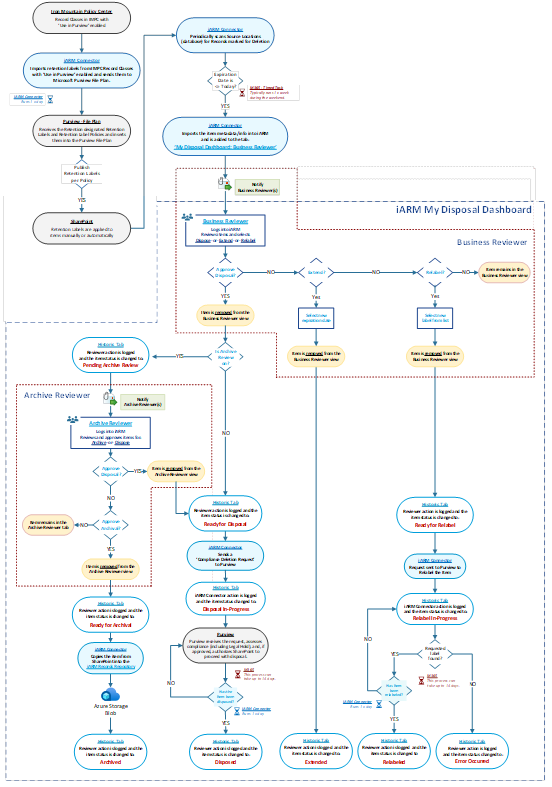
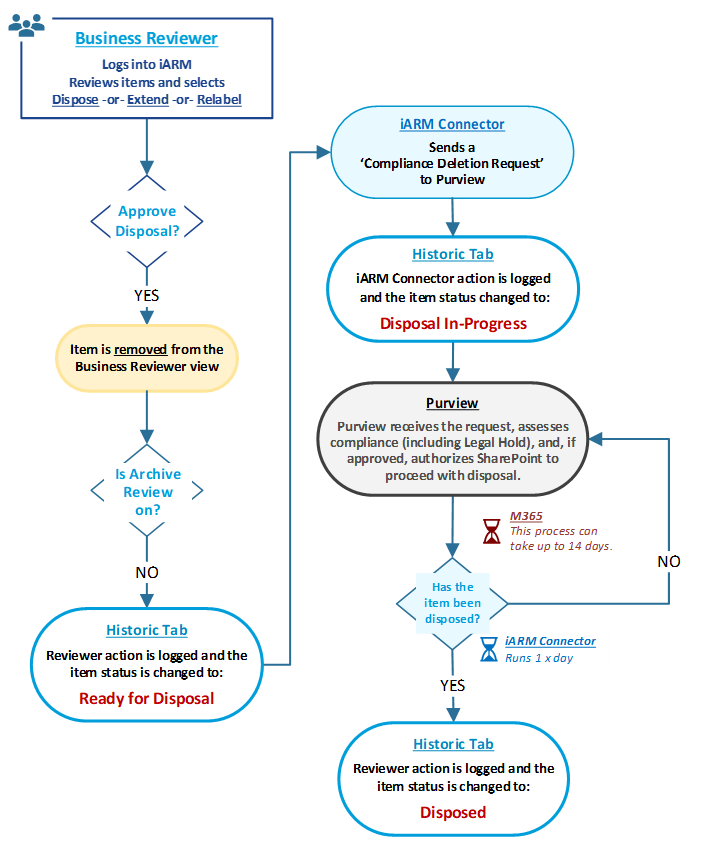
High-Level Item-Level Workflow
The following diagram show the overall all workflow of labelling and disposition to help identify the likely sequence of events or where a document may be in the process.
List of Item-Level Statuses
The following list provides the definitions for each status an item can have in the My Disposal Dashboard:
| # | Status | Description |
|---|---|---|
| 1 | Ready for Disposal | The item has been approved for disposal by either a Business or Archive Approver. |
| 2 | Disposal In-Progress | iARM has sent a disposal request to Microsoft Purview, triggering the SharePoint disposal workflow. The item is actively being disposed of. |
| 3 | Disposed | iARM has confirmed the item has been disposed of, based on the following scenarios: - Non-records are moved to the SharePoint Site Library's 1st stage recycle bin. - Declared records move from the 1st stage to the 2nd stage recycle bin. |
| 4 | Pending Archive Review | The item is awaiting review by an Archive Reviewer. |
| 5 | Ready for Archival | The item has been approved for archival by an Archive Approver. |
| 6 | Archived | iARM has imported the item into the iARM Records Repository, where it can be found in the 'My Data' component of iARM. |
| 7 | Ready for Relabel | A Business Approver has selected a different retention label for the item. |
| 8 | Relabel In-Progress | iARM has sent a relabel request to Microsoft Purview. The item is undergoing relabeling, a process that can take up to 14 days. |
| 9 | Relabeled | The relabeling process has been completed. |
| 10 | Extended | The item's retention expiration date has been changed to a future date by a Business Approver. |
| 11 | Error Occurred | The item could not be found at the source location. |
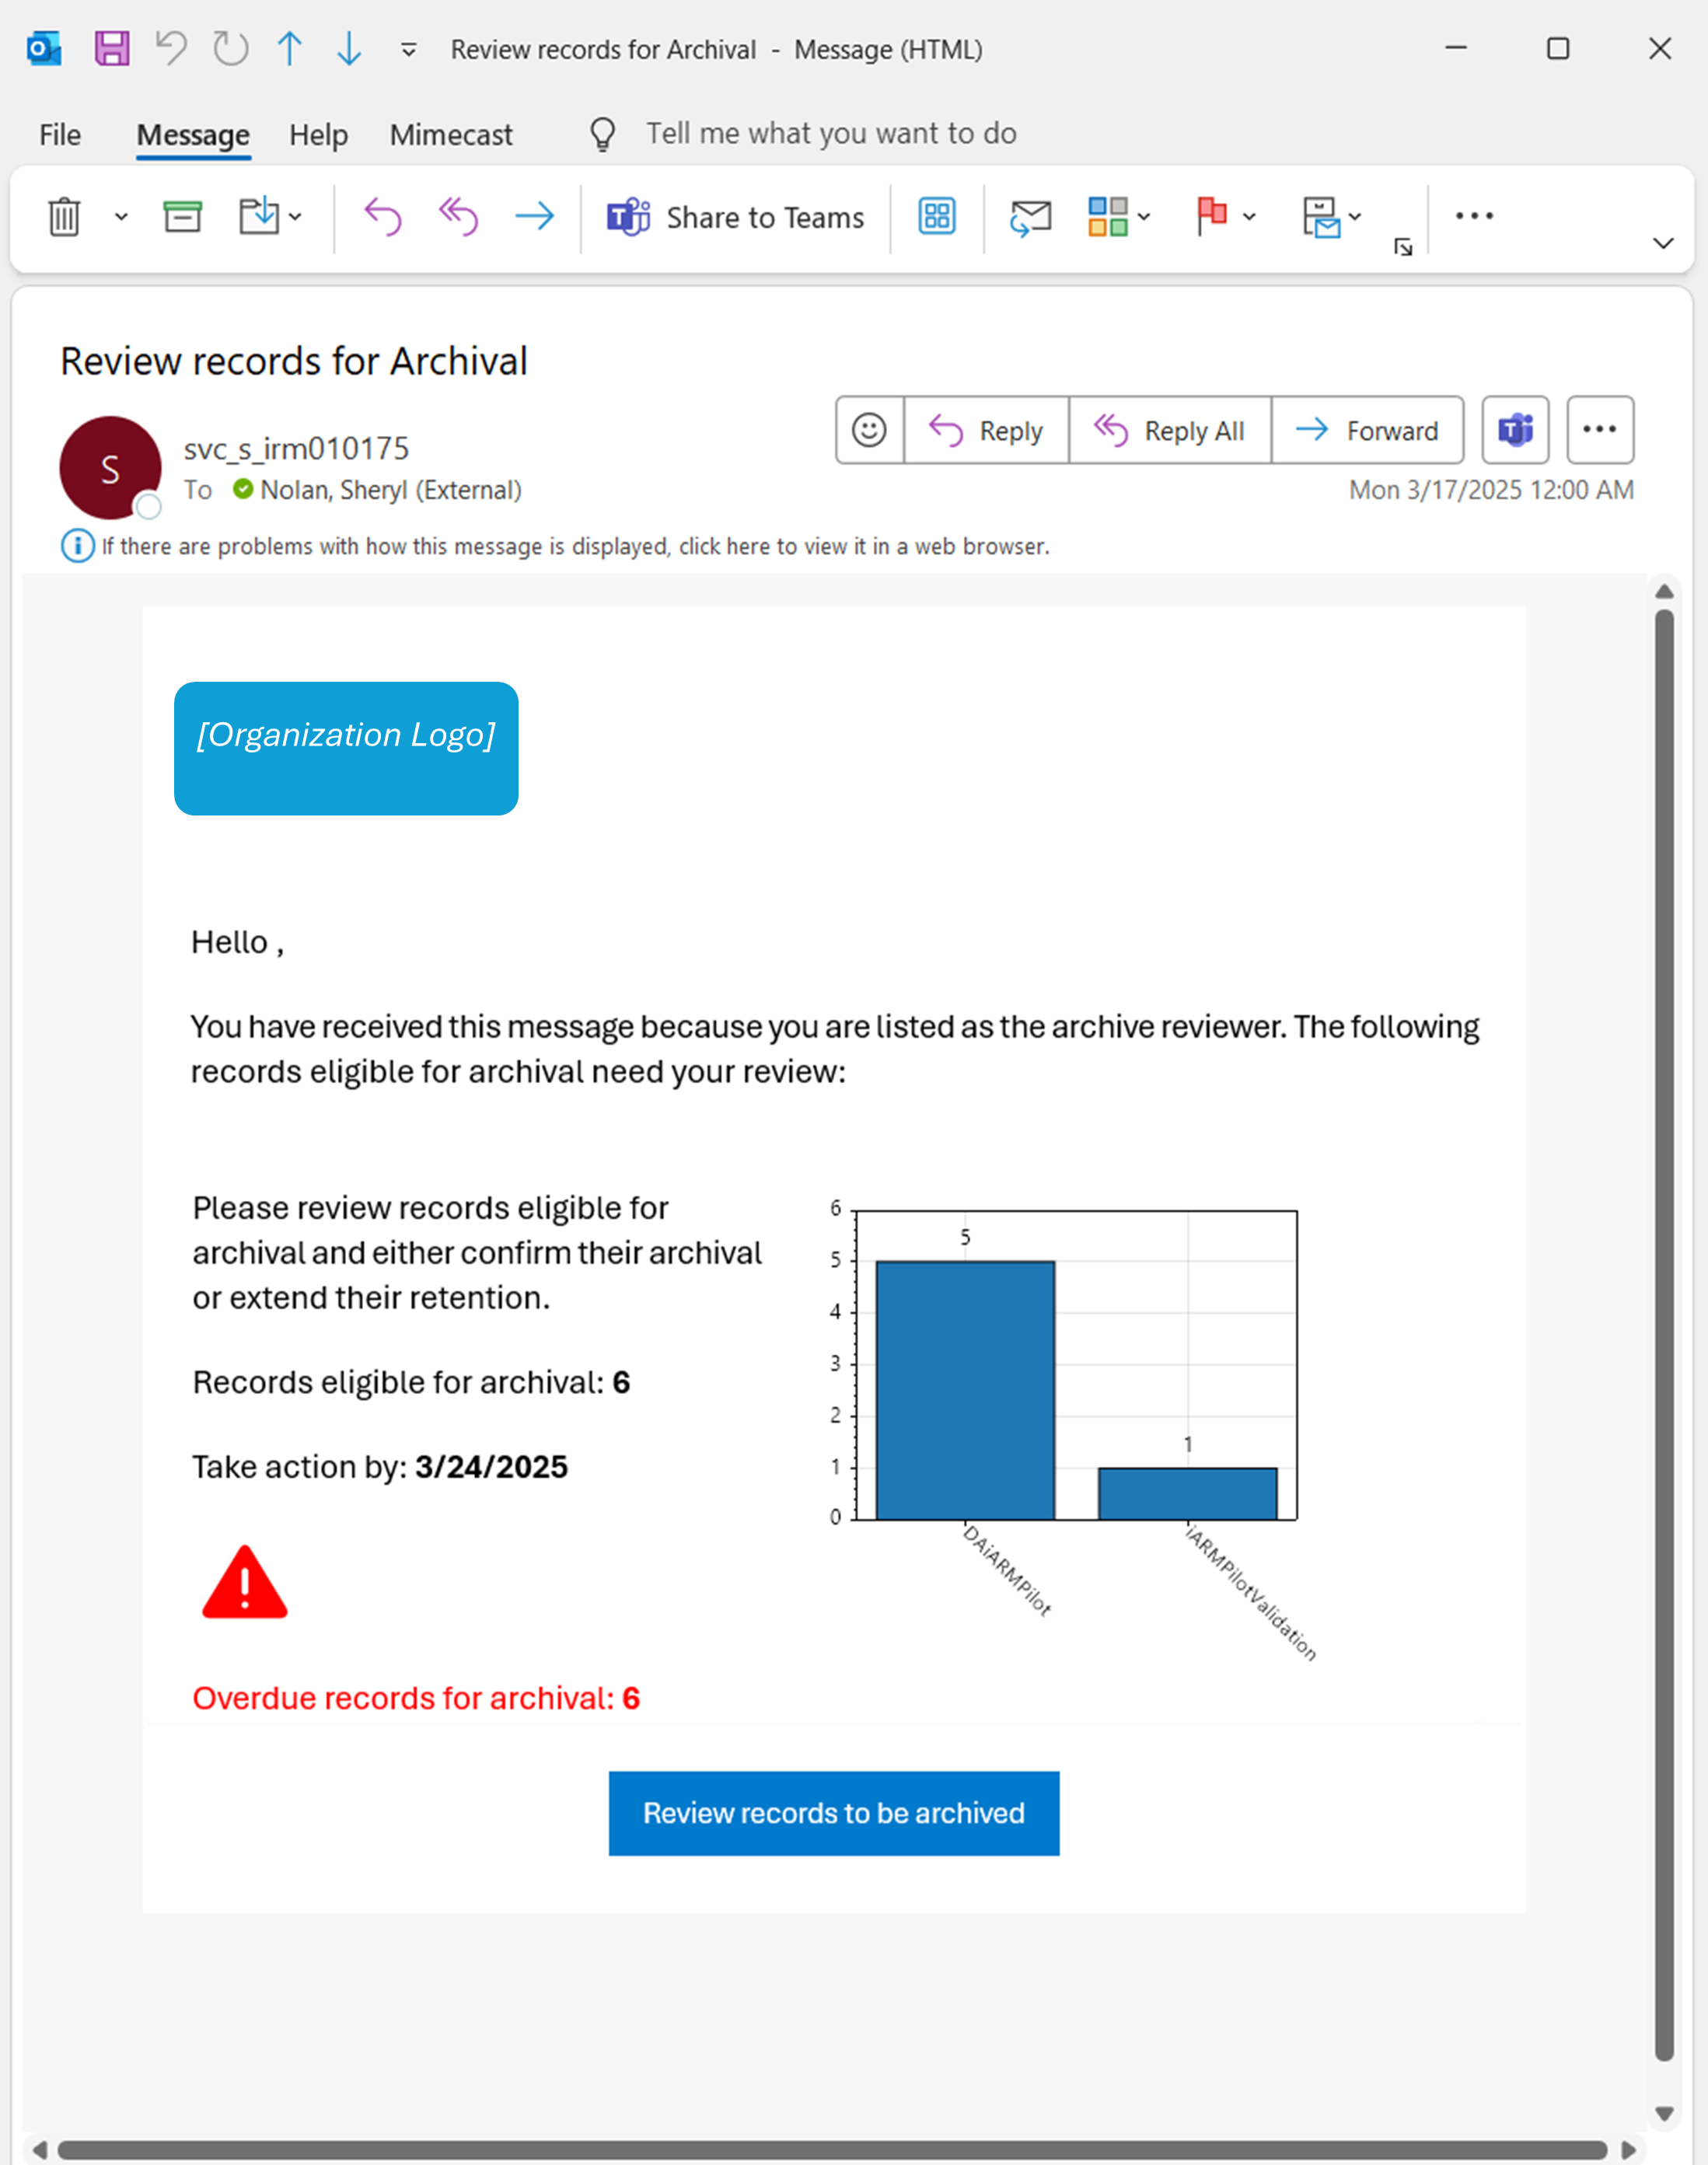
Email Notifications
See [Note: if the email notifications for Business and Archive Reviewer are exactly the same except the name of the role, combined the 2 email sections in this doc into 1 and move to the common UI section]
Email Notification
| # | Item | Description |
|---|---|---|
| 1 | Trigger | For Business and Archive Reviewers that have records to review, a separate email is sent to each Business and Archive Reviewer daily. |
| 2 | Frequency | Once per day. |
| 3 | Sender | Differs per organization. |
| 4 | Recipient | To: [Business Reviewer] or [Archive Reviewer] Cc: n/a |
| 5 | Subject | Review records for Disposal |
Email Content
My Disposal Dashboard: Business Review (BR)
BR: Intent of the Role
The Business Reviewer role is responsible for evaluating and reviewing items for compliance, retention, and disposal in line with business, legal, and regulatory policies. The Business Reviewer understands the business requirements for content and has the appropriate authority to make approval decisions for their business area.
They ensure that records and documents are managed according to organizational policies and regulatory standards, assessing the legality and necessity of retaining or archiving specific items.
Business Reviewers make critical decisions on whether an item should be deleted, its expiration extended, recategorized, or kept for further review, ensuring compliance with regulations and minimizing the risk of non-compliance or excessive data retention.
BR: User Role Capabilities
The following table shows the actions available in each tool that the Business Reviewer is able to make.
| # | iARM Component | Action |
|---|---|---|
| 1 | My Disposal Dashboard | Approve disposal of single or multiple files. |
| 2 | My Disposal Dashboard | Relabel retention label for single or multiple files. |
| 3 | My Disposal Dashboard | Extend retention of single or multiple files. |
| 4 | My Disposal Dashboard | Can see actions performed in the historic tab. |
| 5 | My Disposal Dashboard | Use all filters, seeing data only for sites they are set up for. |
| 6 | My Disposal Dashboard | Manage columns of my disposal dashboard. |
| 7 | Overview | Access the overview section and can see data for all users. |
| 8 | Reports | Access all sub-parts of the reports section and can see data for all users. |
| 9 | Request a Space | User can access Request a Space. |
| 10 | Data Explorer | User can access Data Explorer. |
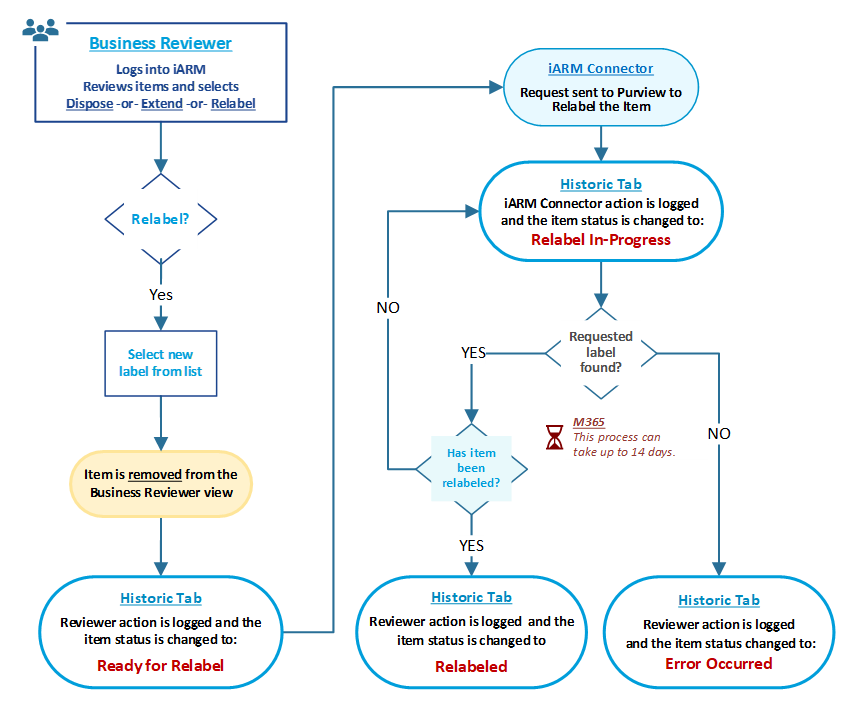
BR: Workflows (Dispose, Extend, Relabel)
The following diagram shows the workflow of possible decisions and status of files that the Business Reviewer has available within the application.

BR: Dashboard
As above, the Business Review table shows the items accessible by the business reviewer. The business reviewer is someone designated as having sufficient knowledge of documents related to their business function that they can make decisions about disposition activities. They do not need to be the owner of the files.
The following diagram shows the available buttons and actions that can be accessed by the business reviewer when performing a review
BR: How to Approve File Records for Disposal
The following steps should be taken to filter, sort and select records for review or disposition.

BR: Workflow and Status after Approving File Records for Disposal
The diagram below illustrates the workflow of decisions and file statuses available to the Business Reviewer within the application after approval.
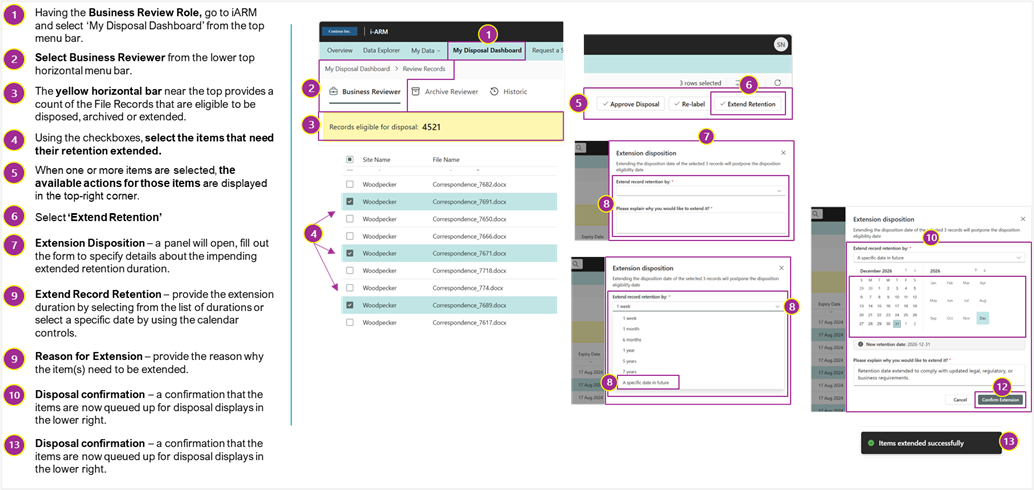
BR: How to Extend File Records
The following diagram shows the available buttons and actions that can be accessed by the business reviewer when extending file retention
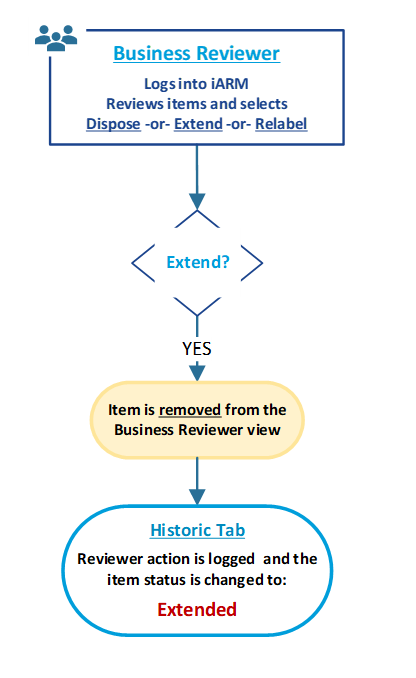
BR: Workflow and Status [after Extending] File Record(s)
The following diagram shows the workflow of possible decisions and status of files that the Business Reviewer has available within the application after extending the retention period on files.
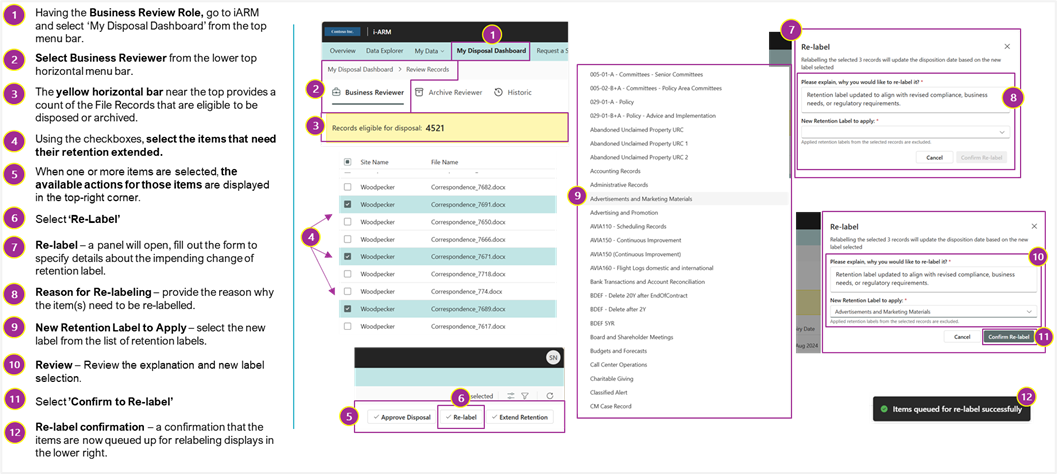
BR: How to Relabel File Records
The following diagram shows the available buttons and actions that can be accessed by the business reviewer when relabeling file records
BR: Workflow and Status [after Relabeling] File Record(s)
The following diagram shows the workflow of possible decisions and status of files that the Business Reviewer has available within the application after Relabeling files.
My Disposal Dashboard: Archive Review (AR)
[Organization Logo]
AR: Intent of the Role
The Archive Reviewer role in Infotechtion's iARM My Disposal Dashboard is responsible for evaluating and reviewing items for archiving in compliance with business, legal, and regulatory policies.
They ensure that records and documents are appropriately archived according to organizational policies and regulatory requirements, assessing whether they need to be retained or archived for long-term storage.
Archive Reviewers make critical decisions on whether an item should be archived, deleted, or retained for further review, ensuring compliance with regulations and minimizing the risk of non-compliance or excessive data retention.
The Archiver Reviewer role/workflow can be enabled or disabled according to the business need.
AR: User Role Capabilities
| # | iARM Component | Action |
|---|---|---|
| 1 | My Disposal Dashboard | Approve disposal of single or multiple files. |
| 2 | My Disposal Dashboard | Approve archival of single or multiple files. |
| 3 | My Disposal Dashboard | View actions performed in the historic tab. |
| 4 | My Disposal Dashboard | Use all dashboard filters and see data only for sites they are configured for. |
| 5 | My Disposal Dashboard | Manage columns of my disposal dashboard. |
| 6 | Overview | Access the overview section and see data for all users. |
| 7 | Reports | Access all sub-parts of the reports section and see data for all users. |
| 8 | Request a Space | User can access Request a Space. |
| 9 | Data Explorer | User can access Data Explorer. |
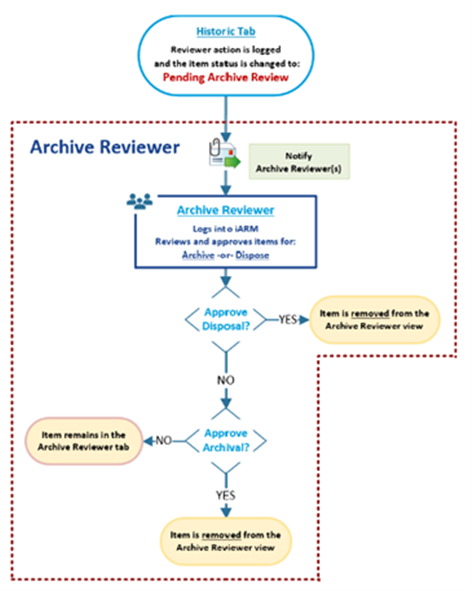
AR: Workflows (Archive, Dispose)
The following diagram shows the workflow of possible decisions and status of files that the Archive Reviewer has available within the application for archival and disposition.
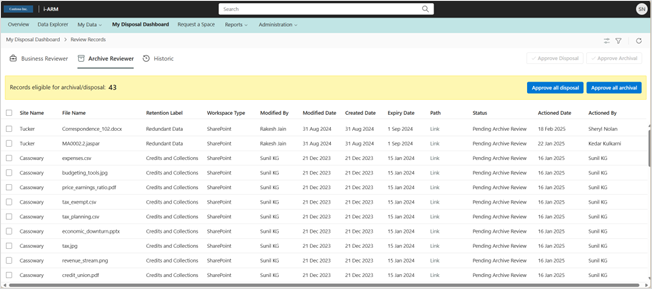
AR: Dashboard
The Archive Reviewer is presented with a similar table of items available for archive.
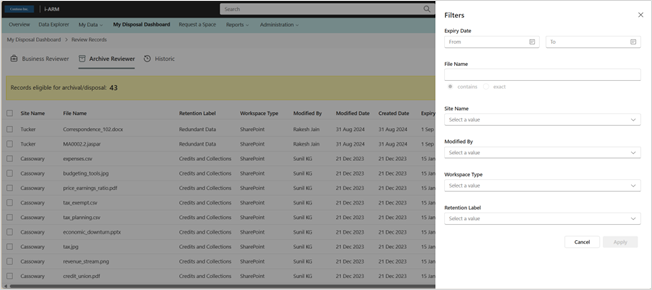
The table can become quite large, and it is useful to apply filters to narrow down the search for information. The filters work by selecting the appropriate value in the selection box or drop-down menu.
AR: How to Approve File Records for Archival
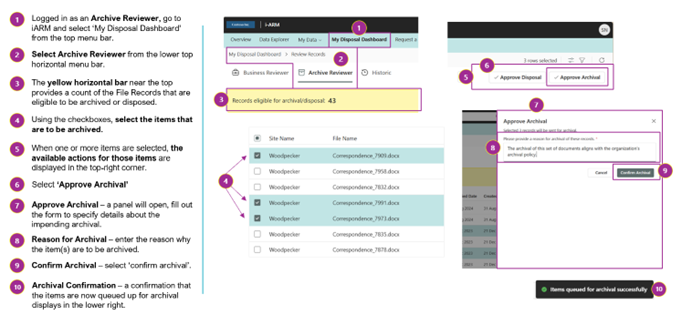
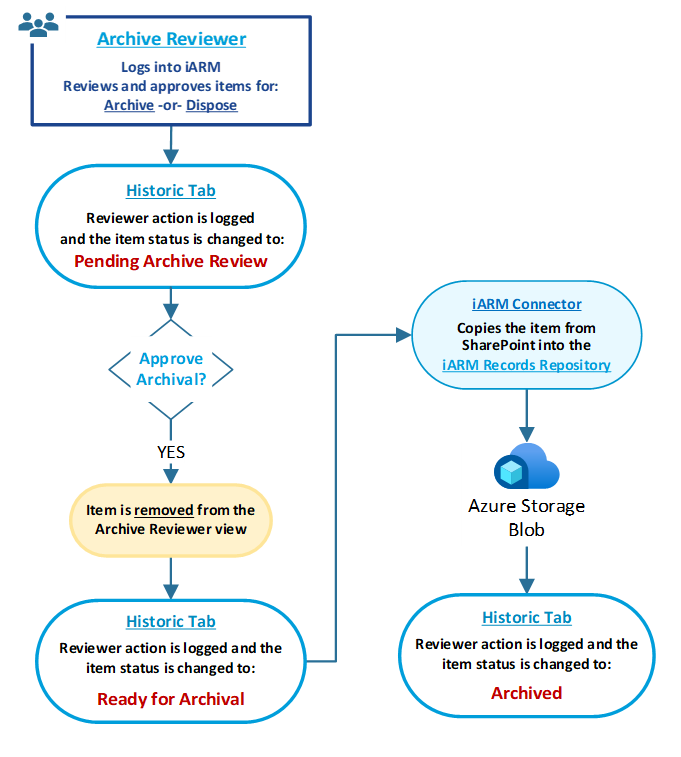
AR: Workflow and Status [after Approving File Records for Archival]
The following diagram shows the workflow of possible decisions and status of files that the Archive Reviewer has available within the application after approving the archival or records.
AR: How to Approve File Records for Disposal
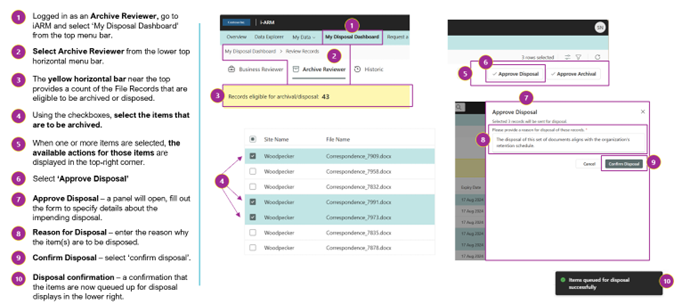
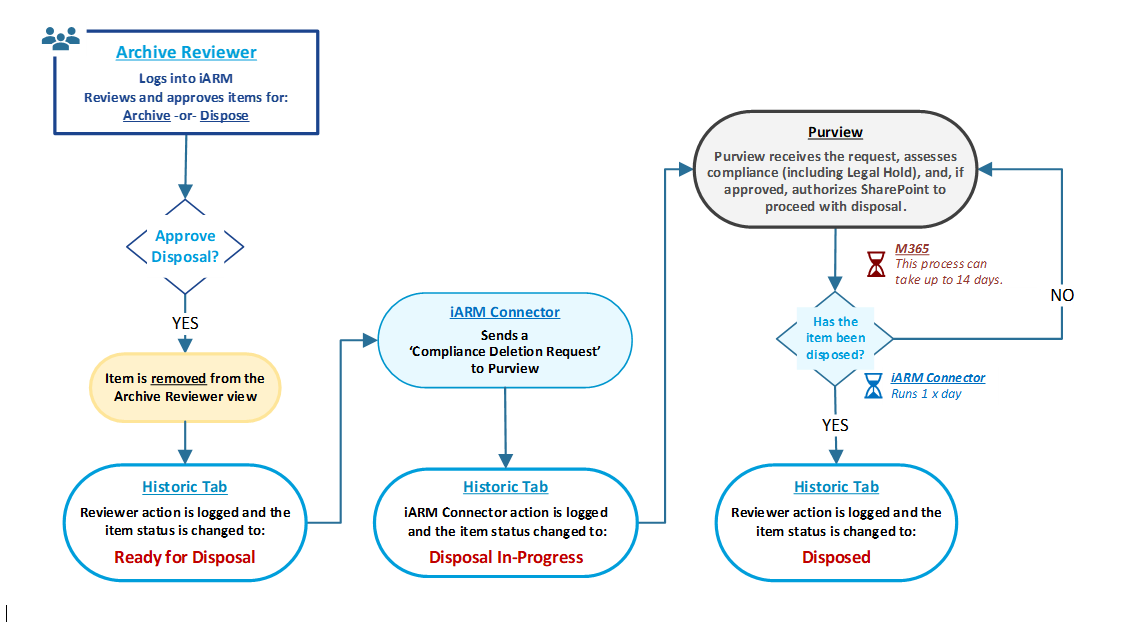
AR: Workflow and Status after Approving File Records for Disposal
The following diagram shows the workflow of possible decisions and status of files that the Archive Reviewer has available within the application after record disposal review.
My Disposal Dashboard: Administration
The following administrator settings are specific to the My Disposal Dashboard.

| # | Component | Description |
|---|---|---|
| 1 | Disposal Settings | Configures the Information Disposal Assessment feature, specifically: (1) Frequency of Checks (Days) and (2) Notification Email (Days). |
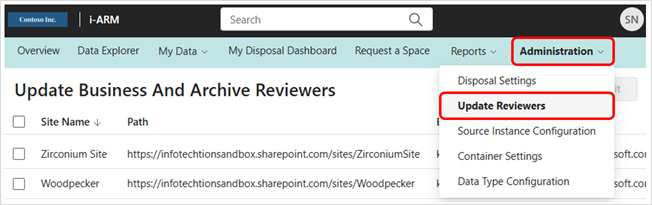
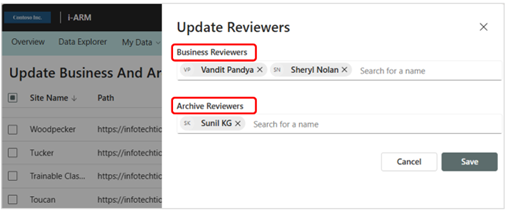
| 2 | Update Reviewers | Used to add/remove business and archive reviewers from a particular site in the disposal dashboard. |
| 3 | Container Settings | Configures the Container Disposal Assessment feature, specifically: (1) Frequency of Checks (Days) and (2) Period While Empty (Days). |
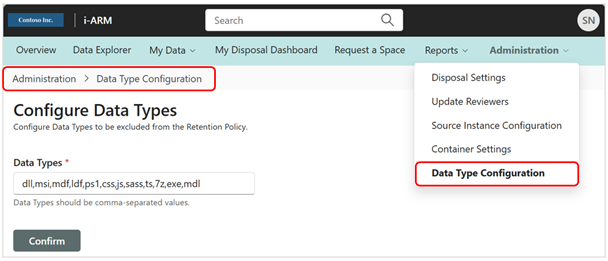
| 4 | Data Type Configuration | Specifies Data Types to be excluded from the Retention Policy. Data types should be in a comma-separated format (e.g., dll, msi, mdf, ldf, ps1, css, js, sass, ts, 7z, exe, mdl). |
Admin: Disposal Settings
The following configurations can be made to the time the disposition review activities occur.
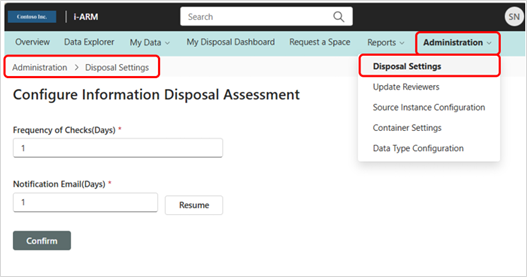
| # | Configuration | Description |
|---|---|---|
| 1 | Frequency of Checks (days) | The number of days between disposition activity checks. This interval can be extended to reduce the frequency of reviews, ensuring they only occur when significant actions are required. |
| 2 | Notification Email (days) | The number of days between email notifications sent to users, regardless of the number of items to be reviewed. |
Admin: Update Reviewers
When business and archive reviewers are added or deleted, the assignment of their review activities can be adjusted through this configuration screen. Add a name by typing in the text box. Reviewers can be removed by clicking on the x next to their name.
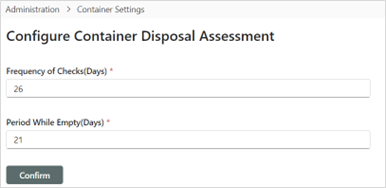
Admin: Container Settings
This is where the Container Disposal Assessment feature is configured; specifically, the (1) Frequency of Checks (Days), and (2) Period While Empty (Days).
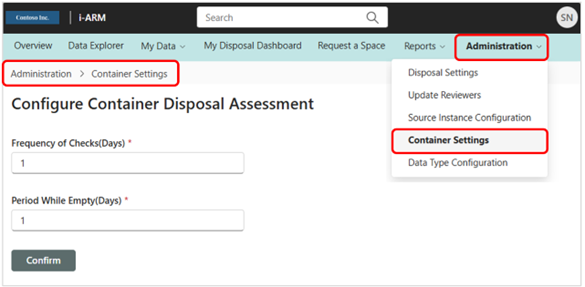
| # | Configuration | Description |
|---|---|---|
| 1 | Frequency of checks (days) | Sets the number of days between when iARM checks M365 for item-level updates (e.g., confirmation that an item has been disposed, archived, or relabeled). |
| 2 | Period while empty (days) | Sets the number of days between when iARM checks M365 for item-level updates if the last update produced zero results. |
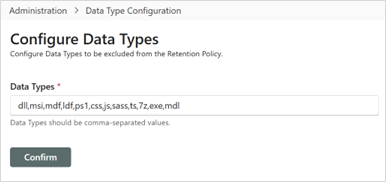
Admin: Data Type Configuration
This is where to specify any Data Types that are to be excluded from the Retention Policy. Data Types are to be provided in comma-separated format. Example data types are: dll, msi, mdf, ldf, ps1, css, js, sass, ts, 7, exe, mdl.
My Data
The My Data component provides access to the folders and files that have been copied from the source location. It also provides the ability to view enriched metadata extracted from the data source.
My Data: Regulatory Compliant File Records Repository
iARM offers the capability to connect to SharePoint Sites, enabling the secure storage of regulatory file records in compliance with SEC Rule 17a-4.
This rule mandates stringent requirements for the preservation and accessibility of electronic records, ensuring they are maintained in a non-rewriteable, non-erasable format.
By leveraging SharePoint, iARM ensures that all regulatory file records are securely stored and easily retrievable, meeting the necessary compliance standards set forth by the SEC.
View Regulatory Records from SharePoint Source Sites
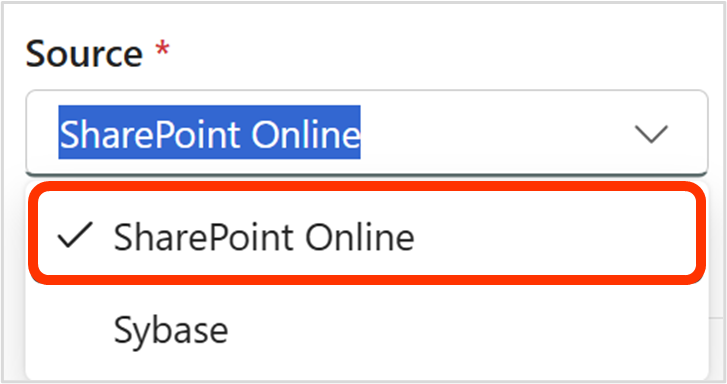
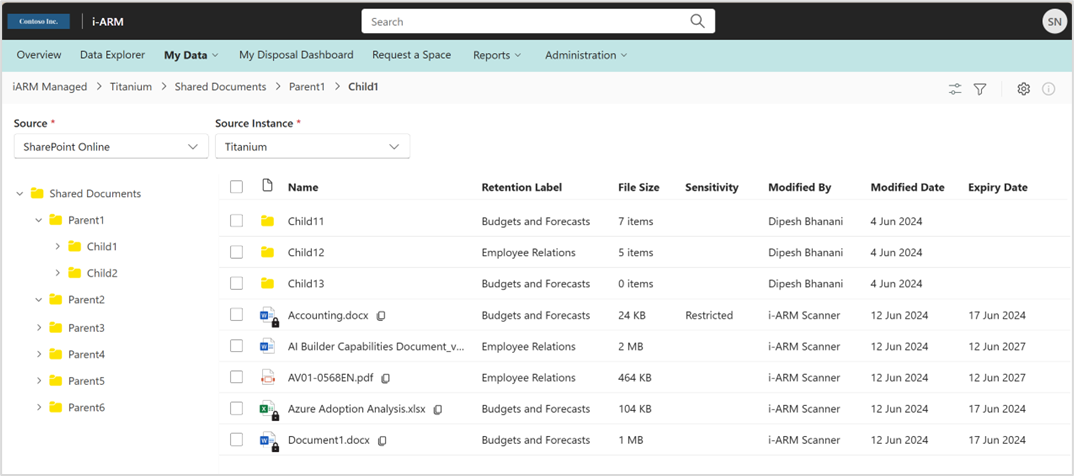
To view the folders and files stored in the regulatory records repository from SharePoint Source Sites, select the data type, source, and source instance from the dropdown menus.
Step-by-Step:
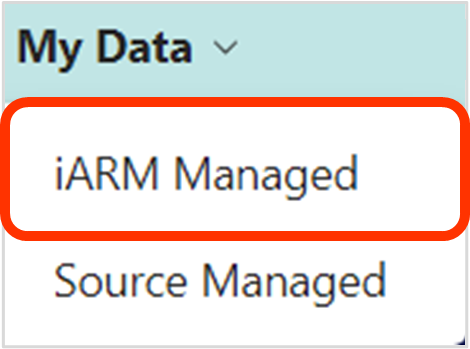
- Select the Data Type
| # | Feature | Description |
|---|---|---|
| 1 | iARM Managed | The iARM Managed UI will display the data that is managed by the iARM portal. This includes files that are managed on immutable storage as regulated compliant repositories. |
| 2 | Source Managed | The Source Managed UI will display the data that is managed by the iARM portal as well as data that is managed in the source location. The iARM portal supports data managed on various sources like Azure Files, Network File Share, SharePoint Online, etc. |
- Select the Source and Source Instance
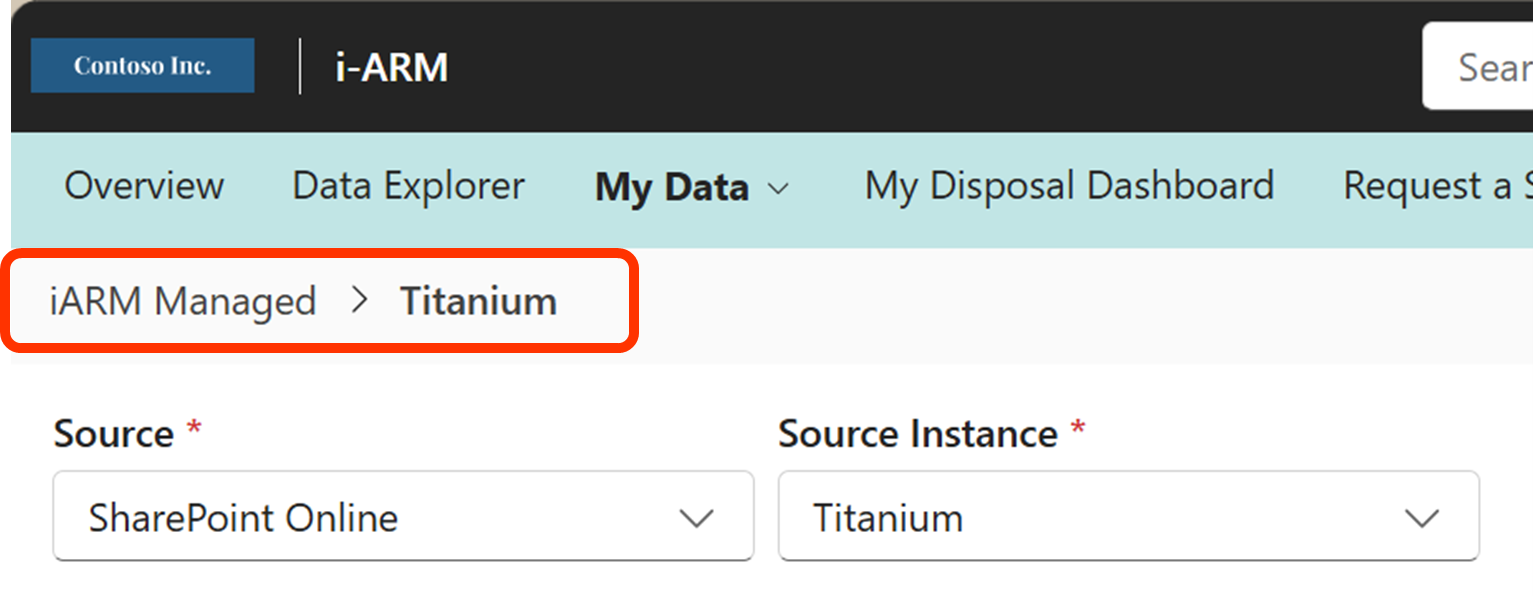
- View folders, files, and metadata in the iARM Repository
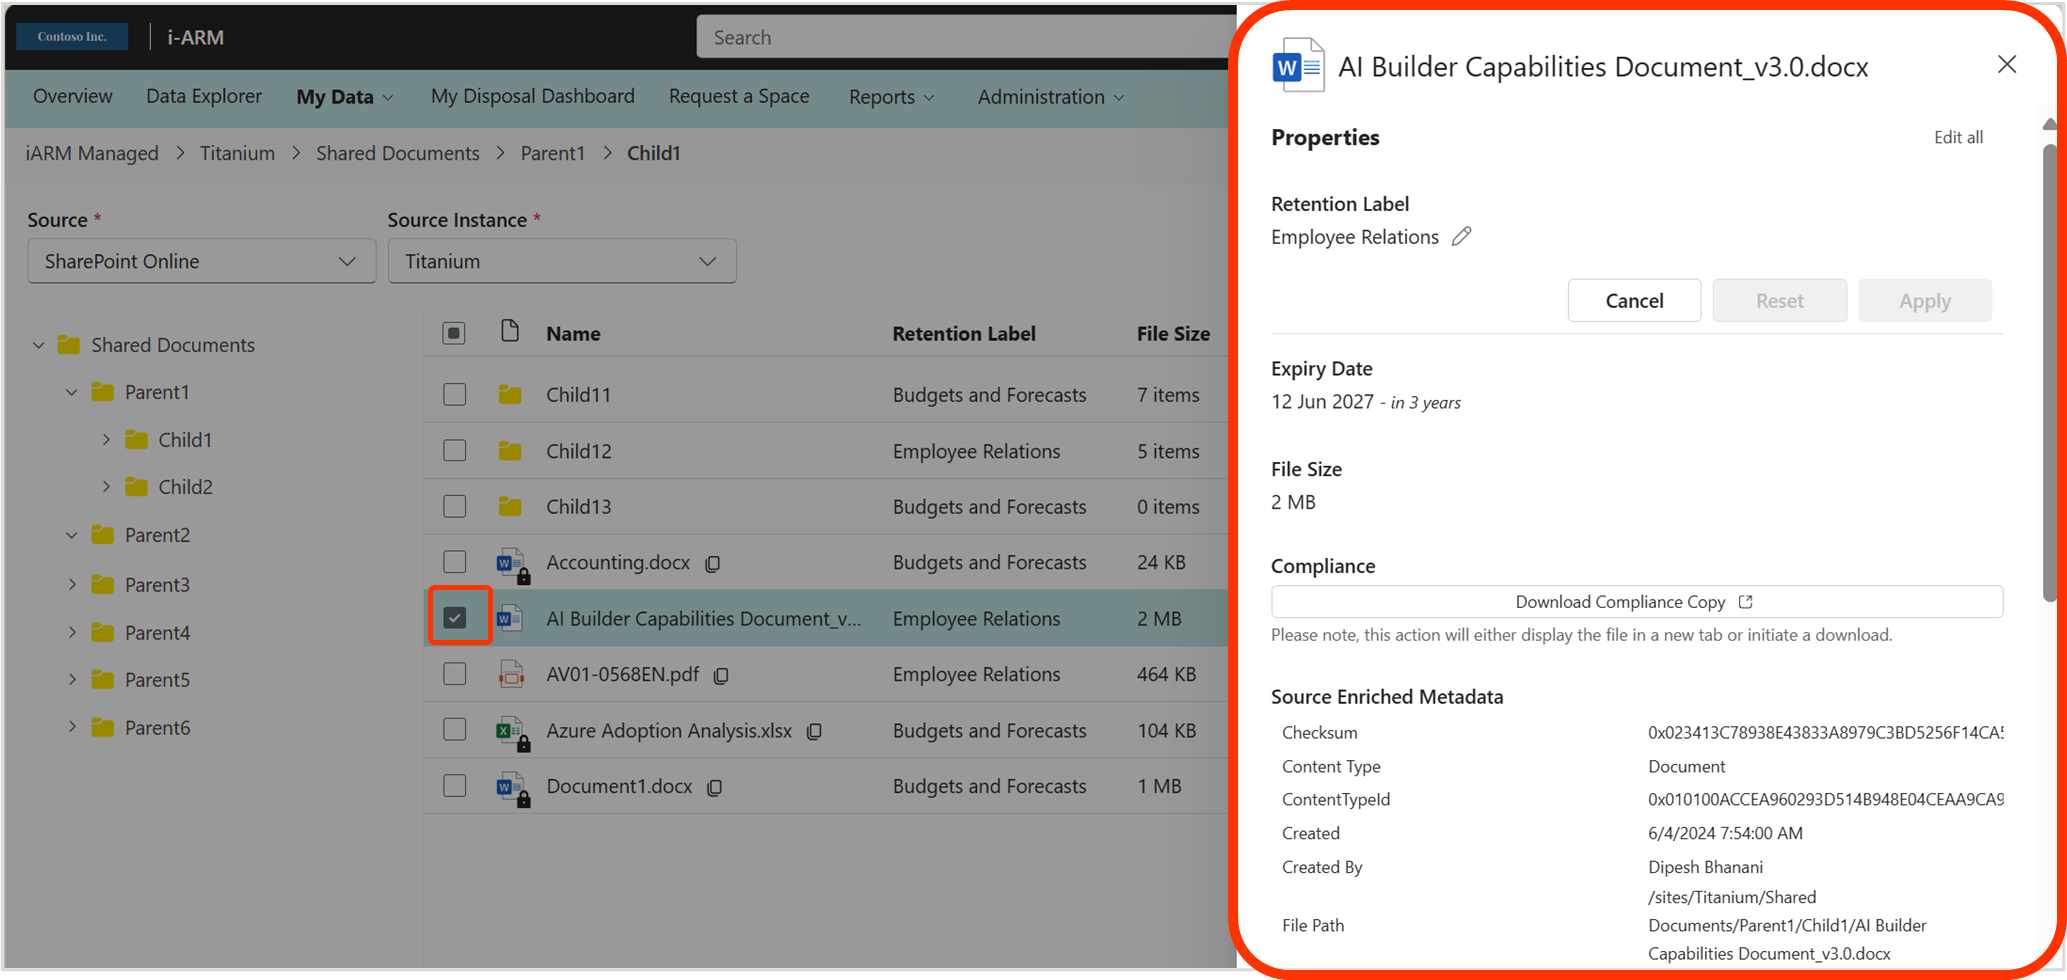
- View the File/Folder Information Panel
The information pane consists of source enriched metadata, history,compliance copy and file size of the files and folders present in the compliant storage location and enables user to apply a retention label to files and folders.
| View the Details Pane by selecting a file or folder, then select the information icon in the upper right corner. |  |

| Description | Image |
|---|---|
| Properties Retention Label – Displays the retention label, which can be changed by selecting a label from the retention label dropdown. Expiry Date – Displays the expiry date (files only). File Size – Displays the size of the selected file and the number of items present in the selected folder. Compliance – User will be able to either open or download the compliance copy of the selected file. |  |
| Source Enriched Metadata Displays the metadata available for the selected folder or file. Example custom metadata: - Business Function - Information Type - Information Status - Jurisdiction Metadata from SharePoint: - Content Type - Content Type ID - Created - Created By - File Path - List Item ID - Modified - Modified By - Retention Label - Retention Label Applied - Sensitivity |  |
| History Displays actions performed by iARM for the folder or file. |  |
-
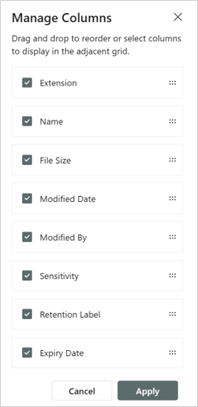
Manage Columns
The folders/files view can be customized.
For the available columns in iARM, they can be selected to show or not (checkbox) and can be ordered (drag and drop) from top to bottom, to view from left to right.
| To manage the columns, select this icon in the upper right corner. |  |

-
Filter Files
Several filtering options can be used to scope the search results down to locate specific items in the storage repository.
| Filtering files can be accessed by clicking on the icon in the upper right corner. | |


| # | Filter | Description |
|---|---|---|
| 1 | Expiry Date | It is used to filter out files according to their expiry date. It is not applicable to folders as folders do not have an expiry date. |
| 2 | Modified Date | It is used to filter items according to the date when the file was last modified. |
| 3 | Name | It is used to filter items by name in two ways: |
| - Contains – Filters items that contain the input given by the user in the name input field. | ||
| - Exact – Filters items that exactly match the string input given by the user in the name input field. | ||
| 4 | Retention Label | It is used to filter items according to the retention labels applied to them. |
| 5 | Modified By | It is used to filter items according to the user who modified them. |
View/Modify Source Instance Configuration
Source Instance Configuration enables the primary owner and secondary owner to manage compliant storage location.
| To view the Source Instance Configuration, select this icon in the right upper corner. |

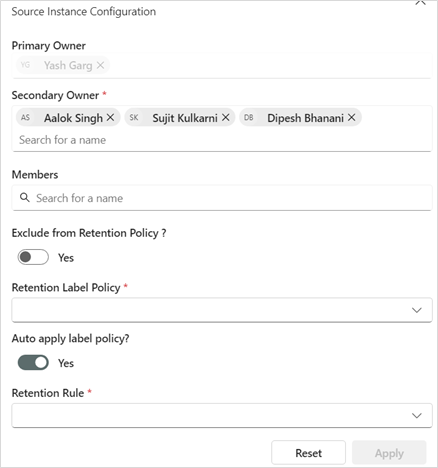
| # | Data Field | Description |
|---|---|---|
| 1 | Primary owner | Has access to add or remove secondary owners and members to the compliant storage location. |
| 2 | Secondary owner | Has access to add or remove secondary owners and members to the compliant storage location. |
| 3 | Members | Members added by the primary or secondary owner(s) can access the source instance folders/files but won't have access to the Administration features. |
| 4 | Retention Label Policy | Primary and secondary owner(s) can choose a retention label policy from the dropdown to be applied to all files copied from the source instance. |
| 5 | Exclude From Retention Policy | Enables excluding the source site from the retention policy. Toggling this option will exclude files of that compliant storage location from the retention label policy. |
| 6 | Auto Apply Label Policy? | If toggled 'yes', it will auto-apply a retention policy when no retention policy is selected. |
| 7 | Retention Rule | The retention rule selected from the dropdown will be auto-applied when no retention policy is selected. |
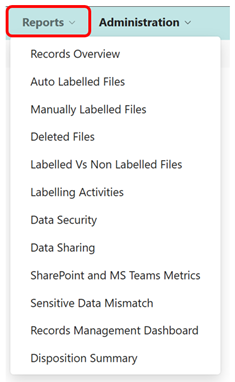
Reports
The Reports tab contains a centralized list of all reports. In addition to the current activity dashboards, there are several reports that show the overall state of the records management program within the organization.

| # | Feature | Description |
|---|---|---|
| 1 | Records Overview | This report shows an overview of the actions performed in the source instances present. |
| 2 | Auto Labelled Files | This report provides a list of all source instances where labels are auto-applied. It shows the volumes of files and their categories that have had labels applied through auto-labeling policies, by workspace, type, and location. |
| 3 | Manually Labelled Files | Combined report for all source instances where labels are manually applied. It includes details on files labelled by staff manually. |
| 4 | Deleted Files | Report on all deleted items. This includes deletion activities from the file explorer as well as records disposition activities, providing insights into storage cost reduction and security improvements. |
| 5 | Labelled vs. Non-labelled Files | Report on labelled and unlabelled items. It offers a holistic view of content categorized as records versus non-records, providing insights over time. |
| 6 | Labelling Activities | Report on the timeline of labelling activities, showing various stages of labelling as an end-to-end process with relative success over time. |
| 7 | Record Management Dashboard | Report on all labelled items. |
| 8 | Disposition Summary | Report on items that are disposed of or ready for disposal. |
| 9 | Regulatory Records | Detailed report on key aspects and metrics regarding Copying SharePoint File Records to iARM. |
Administration
The Administration component shows all the configuration options to configure the iARM product and perform admin activities. It is only accessible to Administrators.

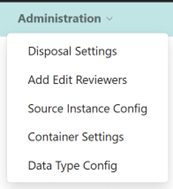
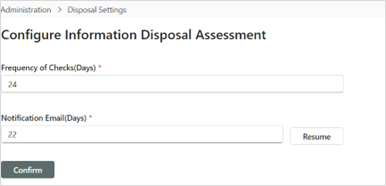
Disposal Settings
This is where the Information Disposal Assessment feature is configured; specifically, the (1) Frequency of Checks (Days)*, and (2) Notification Email (Days)*.
Add Edit Reviewers
It is used to Add/Edit Reviewers and archive reviewer from a particular site in my disposal dashboard.
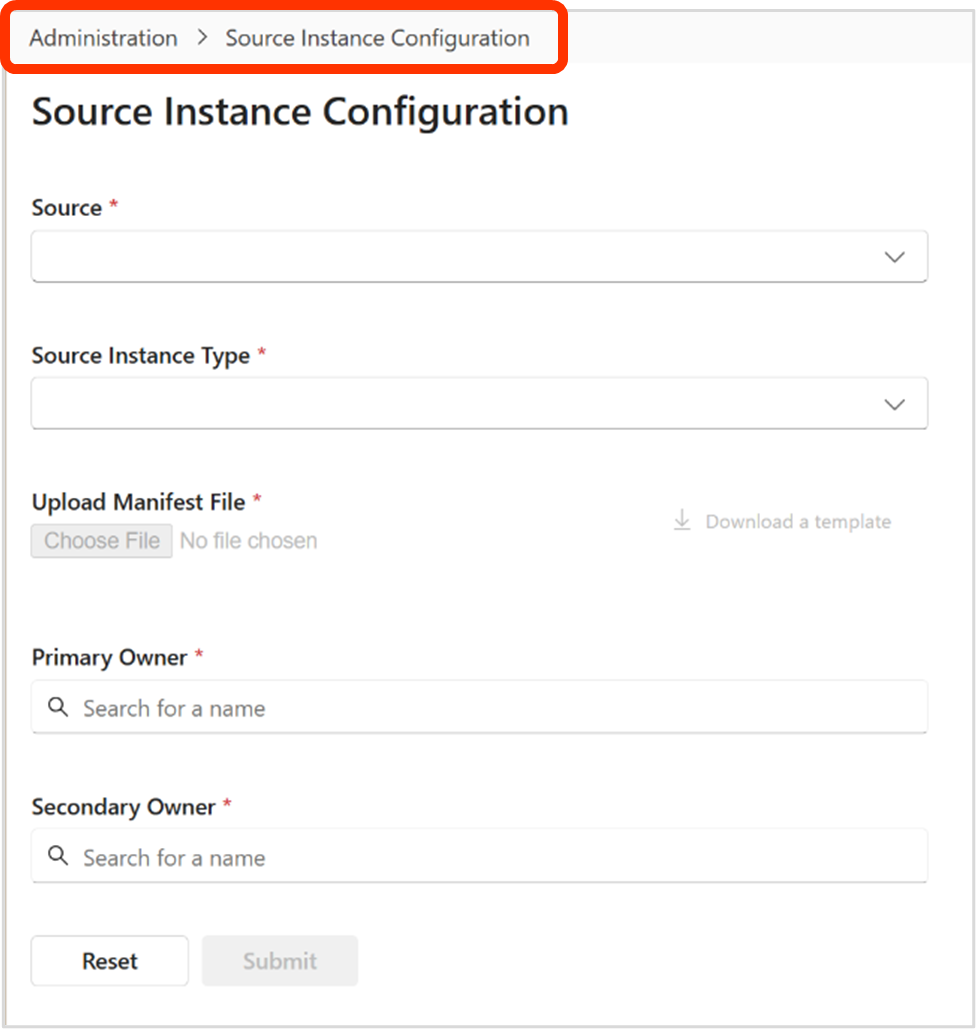
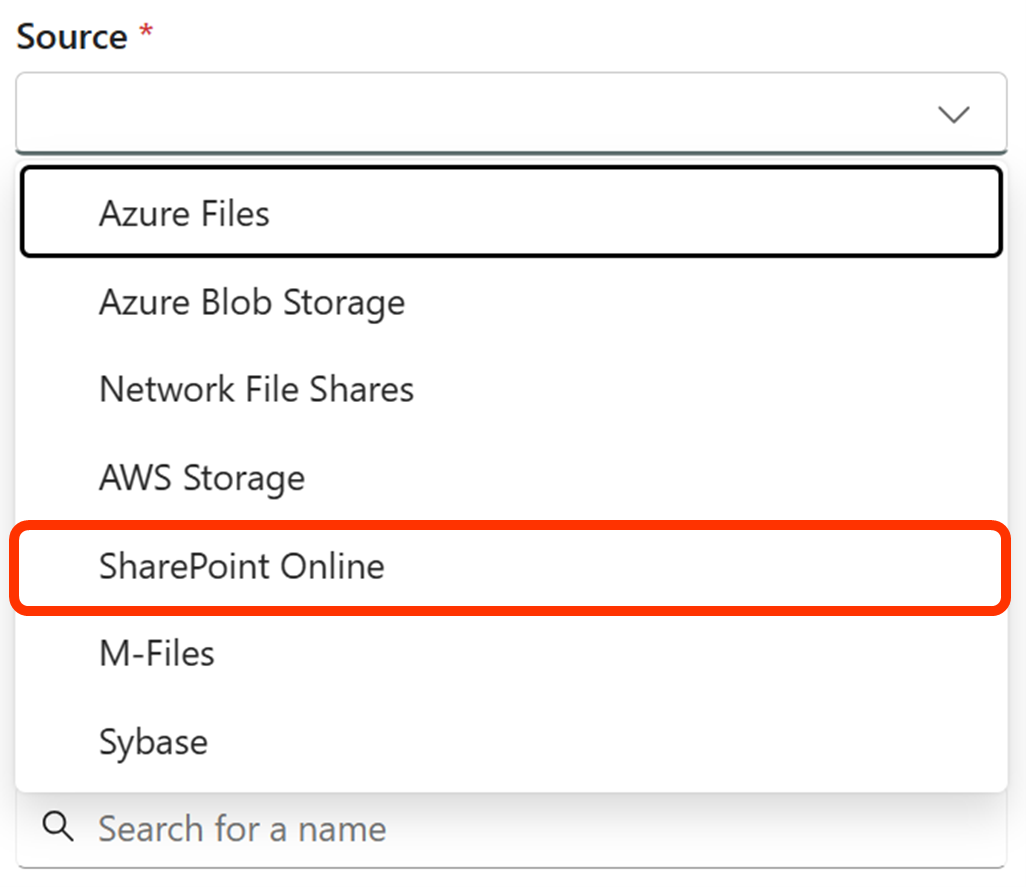
Source Instance Configuration
Source Instance Configuration provides the ability to set up new source instance storage location for one of the many data source types, for example: SharePoint Online, Azure Files, Azure Blobs, Network File Share, AWS, M-Files, etc.
New Regulated Records Repository for SharePoint Source Site File Records
This section provides a detailed set of step-by-step instructions, key considerations, and guidance for establishing a new SharePoint Source Site.
Step-by-Step:
-
Gather SharePoint Source Site Information
a. Collaborate with the SharePoint Source Site Owner (suggested) to gather the following:
b. If there are custom metadata fields that need to be brought with the file into iARM
c. What the Retention Duration needs to be (one value for each Source Site).
d. Identify the Retention Duration
i. For Regulated Storage - specify # of days, no less than 2190 days (=6 years), as specified in regulation SEC17a-4.
ii. For non-Regulated Storage -- specify in # of days, according to the organization's Retention Schedule.
e. Identify the Ingestion Frequency (in days).
-
Provide the Source Site Configuration Details
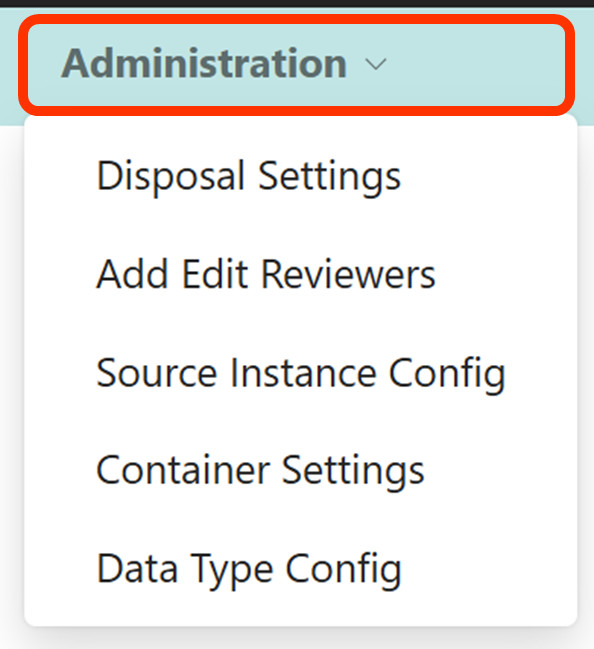
a. Open iARM, with the role of Administrator.
b. Select 'Administration' from the top horizontal menu.


| # | Type | Description |
|---|---|---|
| 1 | Non-Regulated | Select this if the files managed in the iARM repository are not required to be stored in WORM (Write Once Read Many) format. |
| 2 | Regulated | Select this if the files managed in the iARM repository must be stored in WORM format. |
f. Select 'Download a template' - this will download a template Manifest File, into the local machine's downloads folder.

g. Create the Manifest File for the New Source Site
i. Locate the downloaded file and rename it.
ii. Open the renamed file in an XML editor (e.g. Notepad, Azure, ...).
iii. Modify the content of the Manifest File according to the information gathered in Step 1.
Primary Owner
For the primaryOwner field, only one Person or one Security Group is allowed to be provided for this field.
Provide the full email address for the Person/Security Group. For example: [primary.owner@organization.com]
In the event more than one person is specified in the Manifest File, the source site configuration process in iARM will fail.
Example XML - primaryOwner="<primary.owner@organization.com>"
Secondary Owners
For secondary owners, there can be multiple People (or Security Groups?) specified, each separated by a comma.
Example XML - secondaryOwner="secondary.owner1@oganization.com, secondary.owner2@oganization.com, secondary.owner3@oganization.com"
URL
Enter the full URL of the new Source Site.
Example XML- "https://organizationname.sharepoint.com/sites/sitename"
SourceInstanceName
Provide the exact same Site Name, which is in the site's URL.
Example XML - "Site Name"
Is Pilot
During the pilot phase, setting 'IsPilot' to `true` allows the `immutableStorageRetentionDuration` to be set to a short duration - 1 day, to enable end-to-end testing to be efficient.
This setting also provides the ability for files created during the testing phase to be deleted once the pilot testing is complete, thus reducing Azure storage costs and ensuring the repository only contains regulatory records.
An IT administrator can delete the test files from Azure storage after the (short) retention period has passed, provided the IT administrator has the required permissions and no policy exists on the organization's customer tenant blocking the action.
Example XML - isPilot="true"
Immutable Storage Retention Duration
In production, the minimum retention duration is six years (2,190 days) per regulation, and any changes to the `ImmutableStorageRetentionDuration` must be longer than the current setting once the initial iARM scan is complete.
The minimum immutable storage retention duration in iARM is six years (2,190 days), as specified in regulation SEC17A-4. The Manifest File must contain a value for immutable storage retention duration that is 2,190 days or higher to be valid.
Once a Source Site is configured in iARM and the initial scan is complete, any modification to the `ImmutableStorageRetentionDuration` must be set at a higher number than the current setting. The `ImmutableStorageRetentionDuration` must be specified as a numerical integer value representing the number of days.
Example XML - immutableStorageRetentionDuration="2190"
Incremental Scan Duration
During the Pilot phase, we recommend setting a low incrementalScanDuration, such as 1 day, which will make the testing phase more efficient.
For production, the organization can determine the incremental scan duration. For SEC17a-4 compliance, a common frequency for the banking industry is every 7 years.
The incremental scan copies files from the source site to the iARM regulatory compliant repository (SEC17a-4) at the frequency specified.
The `incrementalScanDuration` must be specified as a numerical value representing the number of days.
The iARM copy scan is typically set to run at midnight UTC, however it can be scheduled for other times and time zones, based on the organization's needs.
Example XML - incrementalScanDuration="7"
Metadata
Include metadata fields in the Manifest File that are pertinent and valuable to your business, legal, or regulatory requirements. For guidance on including additional metadata fields in the Manifest file, reference this section: Metadata Fields to include in the Manifest File
Example XML - <field> Metadata Field Name 1 </field>
- <field> Metadata Field Name 2 </field>
Is Sensitive
For files that have sensitive information in their metadata, the IsSensitive="true" setting can be included in the Manifest File.
When IsSensitive is specified for a metadata field, iARM will mask the metadata in the iARM UI.
In place of the sensitive metadata, the End User will see a string of asterisks (e.g. *********).
Example XML - <field IsSensitive="true">Metadata Field Name</field>
Example Manifest File
Update source instance name, primaryOwner, secondaryOwner. Keep immutableStorageRetentionDuration less than or equals to 7 for pilot mode.
Add/remove metadata as required.
Specify which field(s) contain sensitive information by using the 'IsSensitive' attribute.
h. Save and close the Manifest File.
i. Upload Manifest File -- Manifest.xml file can be browsed and uploaded consisting of source instance name, metadata fields, cloud storage solutions link, primary owner, secondary owner etc. Manifest file can only be uploaded when source and source instance type are selected.
j. Return to iARM > Administration > Source Instance Config.
i. Browse for the Manifest file - Click on 'choose file' and select the manifest file to be uploaded.
ii. Upload file - After selecting the file, click open
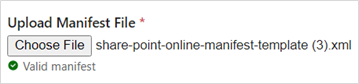
iii. Manifest File Validation -- At upload, iARM will validate the manifest file. If the source instance is successfully created, a confirmation message will display in the lower right corner.

If the source instance is unsuccessful, an error message will display in the lower right corner. If this is the case, review the steps above to troubleshoot how to resolve.

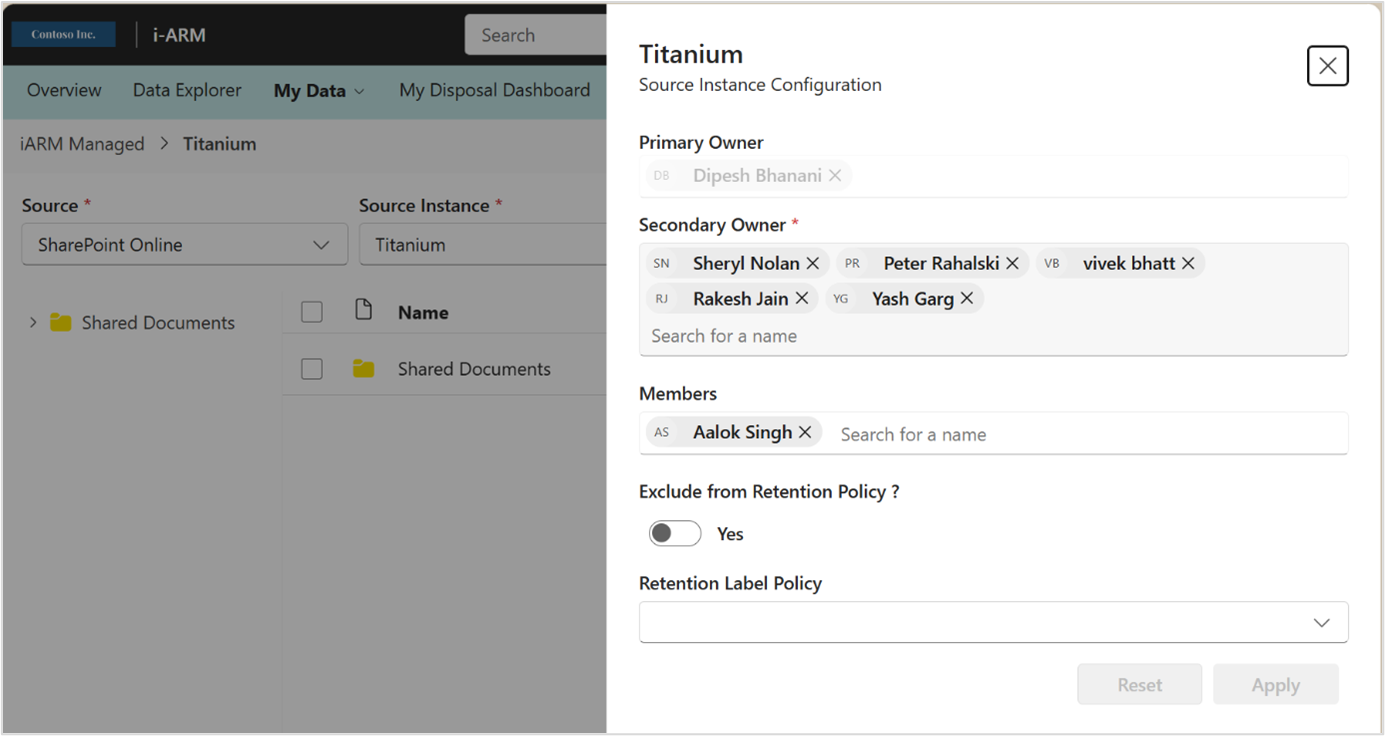
When the XML file is uploaded, the data from the XML file for Primary and Secondary Owners will display as shown below and can be edited before final submission.
The Primary and Secondary Owners of new compliant storage location will have access to the source instance configuration panel in the Administration component of iARM.

- Select 'Submit' to finalize the setup of the new the SharePoint Source Site
Certain SharePoint metadata is automatically transferred with the file into iARM.
The table below lists the SharePoint metadata fields that will automatically be copied into iARM; these fields do not need to be entered into the Manifest File during the Source Site configuration.
| Metadata Field Name | Example Data | OOB SP or Custom or iARM | Automatically Copied with File to iARM |
|---|---|---|---|
| Title | Accounting.docx | OOB SP | Yes |
| Content Type | Document | OOB SP | Yes |
| Content types in SharePoint define attributes of a list item, document, or folder. | |||
| ContentTypeId | 0x0101 00D2BD302D89DA68429F5DC90ED9FF80DD 007B372201B1928D4DB833B636FEAFE50B | OOB SP | Yes |
| ContentTypeId is a unique identifier for a content type in SharePoint. | |||
| ListItemId | 15 | OOB SP | Yes |
| File Path | /sites/SiteName/LibraryName/FolderName/Accounting.docx | OOB SP | Yes |
| Created | 6/11/2024 5:32:00 AM | OOB SP | Yes |
| Created By | [Person Name] | OOB SP | Yes |
| Modified | 6/11/2024 5:35:00 AM | OOB SP | Yes |
| Modified By | [Person Name] | OOB SP | Yes |
| Sensitivity | Restricted | OOB SP | Yes |
Metadata Fields to include in the Manifest File
Ensuring necessary metadata is available and connected to the file record in the regulatory compliant repository is crucial. Include pertinent metadata fields in the Manifest File to meet business, legal, or regulatory requirements.
Identify metadata from the SharePoint source site that isn't automatically transferred and needs to be included in iARM. From the listing validate which metadata needs to accompany the file and include them in the Manifest File as needed for compliance.
The metadata specified in the Manifest File can be viewed in the file information panel in iARM, by selecting a file and clicking the 'i' icon which will open the file's information panel on the right. This panel provides access to SharePoint file metadata, the latest file revision, and any custom metadata, as specified in the Manifest File.
When Source Site File Records don't meet regulatory criteria
There are times when File Records fail to be copied into the Regulatory Compliance Records Repository. The root cause of these errors could be due to something about the file in SharePoint itself or due to a system/process error spanning the network, system hardware, data connections, and software.
When File Records copy errors do occur, there is a notification process in place that communicates the specific error that occurred and provides instruction for how to resolve the error.
The following diagram depicts the process and data flow for File Records copy errors from a SharePoint Site source to the regulatory records repository in iARM:
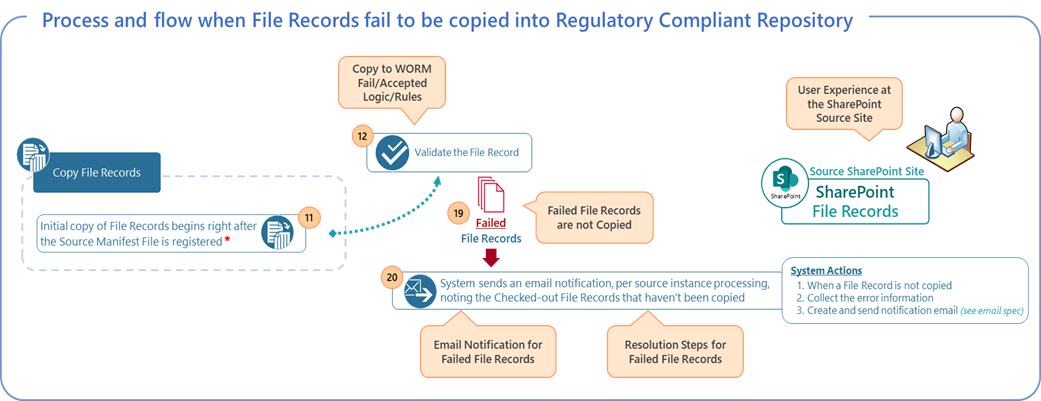
File Records Copy Error process and workflow:
-
When the iARM copy scan occurs, all errors are captured during the process.
-
iARM captures the type of error for each file.
-
For all errors of a single SharePoint Source Site, iARM creates a CSV file, inserts a row for each file, and creates columns for the key metadata of the file. For example: site URL, site name, file name, error type, description and instructions for how to resolve.
-
iARM creates an email notification, with the CSV file attached.
-
The body of the email contains information regarding why the email was sent, what happened and what actions are needed to resolve the error(s) and by when.
-
The email notification is sent to the Primary Owner and Secondary Owner(s).
-
Recipients review the notification and take any action deemed necessary.
-
Upon the next iARM copy scan:
a. If the error(s) are resolved, the file is copied into the iARM repository.
b. If the error(s) have not been resolved, steps 1-7 will occur again and continue until all errors are resolved.
Example
Email Notification
The message and configuration of the email notification is intended to be customized as needed by the organization using iARM.

Example
CSV file attached to the Email Notification
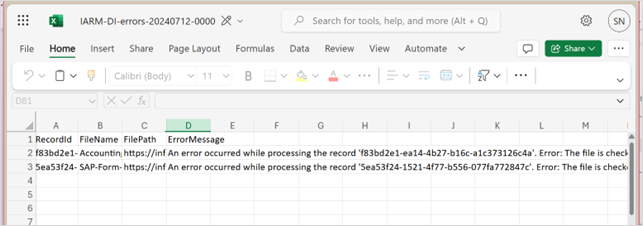
Columns and Data provided in the CSV File
| Record ID | File Name | File Path | Error Message |
|---|---|---|---|
| f83bd2e1-ea14-4b27-b16c-a1c373126c4a | Accounting.docx | /sites/SiteName/LibraryName/FolderName/Accounting.docx | An error occurred while processing the record 'f83bd2e1-ea14-4b27-b16c-a1c373126c4a'. Error: The file is checked out by [Name] and will be skipped for the current ingestion process. Please ensure to check it in before the next incremental scan schedule. |
| 5ea53f24-1521-4f77-b556-077fa772847c | SAP-Form-1154.docx | /sites/SiteName/LibraryName/FolderName/SAP-Form-1154.docx | An error occurred while processing the record '5ea53f24-1521-4f77-b556-077fa772847c'. Error: The file is checked out by [Name] and will be skipped for the current ingestion process. Please check it in before the next incremental scan schedule. |
Example
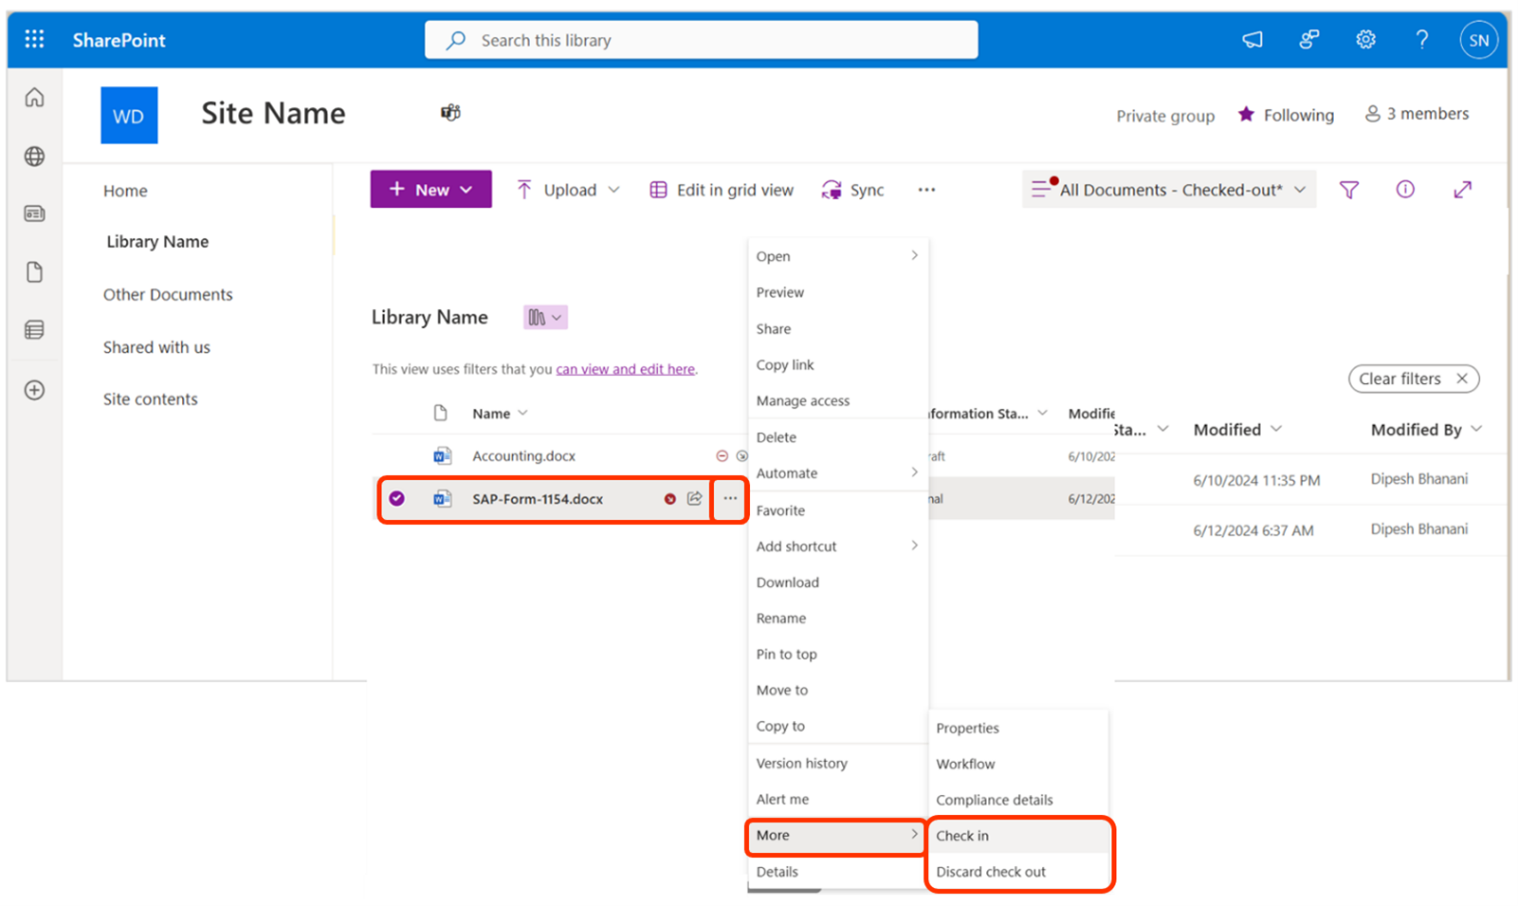
Resolving copy errors due to the file being Checked-out
Resolving copy errors due to the file being Checked-out
The error message in the CSV file for when a file is checked-out describes that to resolve the issue, the file needs to be check-in.
Another way to solve this is to have a member of the source site with the necessary permissions discard the check-out. Visuals for both resolution paths are shown below:
Error Message: File Checked-Out**
To resolve this issue, you can:
-
Check-In the File: Ensure the file is checked back in.
-
Discard Check-Out: A member with the necessary permissions from the source site can discard the check-out.
Visuals for both resolution paths are shown below:
Container Settings
This is where the Container Disposal Assessment feature is configured; specifically, the (1) Frequency of Checks (Days), and (2) Period While Empty (Days).
Data Type Configuration
iARM Support
SUBMITTING SUPPORT REQUESTS AND ACCESS
-
The Customer may request Support Services by way of a Support Request sent in email to: <support@infotechtion.com>
-
Each Support Request shall include a description of the Operational Fault [or Vulnerability] and, where relevant, the start time of the incident.
-
The Customer shall provide the Supplier with:
-
Prompt notice of any Faults which it becomes aware of; and
-
Such output and other data, documents, information, assistance and (subject to compliance with all Customer's security and encryption requirements notified to the Supplier in writing) remote access to the Customer System, as are reasonably necessary to assist the Supplier to reproduce operating conditions similar to those present when the Customer detected the relevant Operational Fault and to respond to the relevant Support Request.
-
-
Save for where the Supplier reasonably determines that it requires access to the Customer Site to provide the relevant Support Service, all Support Services shall be provided on an off-site basis (such as over the telephone or by e-mail) from the Supplier's office.
-
The Customer acknowledges that, to properly assess and resolve Support Requests, it may be necessary to permit the Supplier direct access at the Customer Site to the Customer System and the Customer's files, equipment and personnel.
-
The Customer shall provide such access promptly (provided that the Supplier complies with all the Customer's reasonable security requirements and other policies and procedures relating to contractors entering and working on the Customer Site) notified to the Supplier in writing reasonably in advance.
For additional details, see the Service Level Agreement